Sunday, July 26, 2015

Dining-In: A Culinary Tour of America-Kailua, Hawaii

The Location: Kailua, Hawaii


2010 census: 36,513 people. 2013 per capita income: $25,138. 2010 census: 43.8% white, 21.1% Asian.

Kailua means "Two seas" or "Two currents" in Hawaiian. It is estimated that people came to Kailua and the rest of Hawaii in the 500's AD. During the 1500's, Kailua became home to the "Ali'i", or the ruling class that governed the region. Kailua became the residential seat for the Ali'i, replacing Waikiki.

Kailua remained a small town throughout the years of colonization by various cultures, until World War II, when Fort Hase and Naval Air Station Kaneohe Bay were built. This brought in a large increase in population that never went down again after the war ended. The area continued to grow, with a hospital, churches, and schools being built. The first supermarket was opened in 1947.

Kailua Beach is thought to be the best beach in the entire state. It is a popular destination for all kinds of surfing, including traditional and wind surfing. President Obama has visited Kailua five times on his winter vacation during his tenure as president. This has increased tourism to the area, with people hoping to catch a glimpse of the president or his family.

The Food: Traditional Luau

This blog posts marks the halfway mark for this project. For my 25th post, I am honoring the 50th state! I researched foods from Hawaii that predated colonization of the region. Hawaii has been influenced by many cultures over the years, including American, Japanese, and even Russian. I wanted to find as close to "true" Hawaiian food as I could. This led me on a journey and a search for ingredients I've never used in my life and were rather perilous if used improperly. For this meal, it wasn't about the final product or how delicious it tasted. It was about trying out new ingredients and preparing them in ways I've never done before. And it was a lot of fun!

One of the ingredients I love most from Hawaii was one I wasn't able to use for this post. Pineapple, widely regarded as Hawaiian, is actually not Hawaiian. Pineapple hails from Brazil, which means, it's presence in Hawaii is the result of colonization. Coconuts were on the ok list, because these are thought to have been brought over by the Polynesian peoples who first inhabited the Hawaiian islands. They are also said to be responsible for bringing taro root to the land as well, which was something that played a very prominent role in my meal.

All of my recipes came from the internet, so I will not write them out here. I will write about the experience and result of making them and you can refer to the link to see the original recipe, if you are interested in trying it.

Lau Lau Pork:

This is the recipe that required the most amount of hard-to-find ingredients, and one that I was never able to find. I don't think it was missed, however. This dish required a trip to two different stores to procure everything. I visited my local Asian market for the second time in two weeks and became the very proud owner of frozen banana leaves and fresh taro leaves. Banana leaves are used to line the crockpot or whatever vessel you use to make the Lau Lau Pork. If you are like me, then you have never seen a banana leaf in person before. They are big! I unwrapped them and they are as tall as, if not taller, than I am! I only needed one to line my crockpot, so I put the rest back in the freezer for future use. What future use they might have besides making more Lau Lau Pork, I have yet to find out. But that will be the challenge, won't it?!

The taro leaves are also big, though not quite as large. They are also poisonous if not handled properly. Fun right?! Believe me, I treated these with great care, and wore gloves and everything. Apparently it's not like you get poisoned and die, but it can lead to skin irritation and kidney stones if not cooked thoroughly. So, treat it properly, treat it with care, but don't be terrified of it. If you know me, then you know how I feel about taking great risks to my personal safety. So, if I can do it, so can you! I cut the stems off the leaves and boiled them a couple at a time in water for a few minutes. This acts to start the cooking process and also makes them more pliable for folding.

For the pork, I just used pork spare ribs that I cut into large pieces. The dish is traditionally made with salted butterfish as well as pork, but I didn't have access to butterfish, so I left it out. For the seasoning, I used a combination of reduced-sodium soy sauce and red Hawiian sea salt. It's actually a sort of coral color and it colors the pork as well. If you can find this in your grocery store, I would recommend using it over Kosher or table salt. It's worth the extra money.


Two taro leaves are overlapped and then you place some of the seasoned pork mixture in the center. Fold it up like a burrito and if you are able to get your hands on the ti leaves that I was unable to get, use those to tie it up. If not, use toothpicks like I did. I used three toothpicks per bundle. Place each bundle into the banana leaf-lined crockpot and repeat until they're all used up. I had one taro leaf leftover so I just placed it on the top to help cover everything.


Put a cup or two of water into the crockpot over the leaf bundles. Place another piece of banana leaf over the top, and fold in the overhanging leaf so it's all well contained. Place a piece of aluminum foil on top of that and top with the lid. Turn the crockpot to low and cook for at least 8 hours. Make sure you actually plug in the crockpot, unlike me. Fortunately my sister was home when I called her on my way to go see Ant-Man and she was able to plug it in for me. Otherwise this would have been a blog meal fail. A very sad and expensive one.

The banana and taro leaves smell strong when you cook them. It reminds me of the smell of jasmine rice, if you are familiar with that scent. The taro flavors the meat and blends well with the soy-salt seasoning. The recipe I based mine off of calls for 4-6lb. of pork, but I used about 1.75lb, so I did the seasonings based on two pounds. This meant 1 1/2 Tbsp. each red salt and reduced soy sauce. However, when I saw just how much one tablespoon of salt looked like on the meat, I chickened out and left it at that. The water you add to the crockpot does help dilute the saltiness a bit so it turned out perfectly for my tastes, but if you like things salty, go ahead and add that extra 1/2 Tablespoon of red salt. This turned out really good!

Poi:


Poi is made from taro root. It is gluten free, fat free, and full of vitamins. Taro root, like the leaves, can also be poisonous if not cooked thoroughly. I got mini taro roots, which most likely means that they were picked before they were fully grown, from the same Asian market that the banana and taro leaves came from. They are sort of hairy on the outside, so when I thoroughly washed these(while wearing gloves), I tried to get as much of that off as I could.

This was a really simple recipe to make. Cover the taro root with water and boil it for about an hour or until softened completely. Remove from the water and peel. Traditionally, poi is made by men. The cooked taro root is placed on a wooden board and mashed with a rock. It's a sacred tradition in Hawaii, so you should enter into making it with reverence. For the people, for the land, and for the ingredient. However, I'm not a man, and though I do have a wooden cutting board I could have used, I didn't have access to a rock, so I just used my potato masher. I think it turned out pretty much the same.


Poi is pretty much everything you've ever heard about it. It's softer than mashed potato, and has a slightly bitter taste to it. I ended up sprinkling a little of the red salt into it just to give it a bit of flavor. I ate a little of it but it definitely isn't something I would seek out again. I did wonder what it would be like if I prepared it like mashed potatoes, meaning adding milk and butter to it. It sort of congeals when it sits for a while so it also made me wonder what breading and frying it would be like. It also turns purple when it oxidizes, but when I ate it, it was still off-white in color.

Haupia: Coconut Pudding

I have never had luck making pudding, besides the packaged kind where you add milk. I tried many times when I was in high school to master pudding-making, only to be banned by my parents from trying it again after so many failed attempts. So, you probably won't be terribly shocked to hear that my pudding-making attempt was yet again a fail. The recipe is basically coconut milk flavored with sugar and vanilla and thickened with cornstarch. You pour it into a pan and let it chill and cut it up into squares. Alas, mine never thickened enough and ironically, turned out to be like what we know as pudding. Except it wasn't supposed to be that way at all. Sigh. The flavor was on point, though. I replaced the regular sugar with coconut sugar, which is an actual thing. The recipe said 4-6 Tbsp. cornstarch and I used 4. I probably should have used 6...But as I said, the flavor was good.


Not everything from this meal turned out perfectly, and not all of it was to my tastes. But that wasn't important. The important thing was immersing myself in ingredients and a culture not my own, for a day. It was a good way to see the world from somebody else's perspective. The Lau Lau pork was fantastic and I have leftovers that I will eat with rice. This was a wonderful meal to make in the summer time, even though yesterday was cold and rainy. It made me think of hot, tropical days in the sun, something definitely lacking in yesterday's weather.

I would highly recommend Lau Lau pork. It takes a bit of prep work, and a trip to an Asian grocery store for the proper ingredients, but once it's in the crockpot, the job is done. If you don't think you're brave enough to try poi, rice would be a perfect starch for this. The haupia, if done properly, would be a good dessert, but if you don't care about pre vs. post colonization ingredients, fresh pineapple would also be a lovely finish to the meal. In fact, I might have some tonight with my leftovers!

Aloha!

Sources:

Haupia and Lau Lau Pork recipe

Kailua info

City pic

City Map

Lau LauPork-my recipe based on this one.

Haupia-my recipe based on this one.

City Info

Poi Recipe


Sunday, July 19, 2015

Dining-In: A Culinary Tour of America-Dearborn, Michigan


The Location: Dearborn, Michigan

2013 census: 95,884 people; 87.9% white(of this, 42.4% are people of Arab ancestry. People of Middle Eastern descent are counted as white for US census purposes. As of 2000, the number of Arab Americans in Dearborn was 40,000.); 4.% African American. Per capita income as of 2013-$19,592.

Dearborn is a suburb of Detroit. Prior to the European invasion, the region was home to Algonquian-speaking Native American groups. The French were the first Europeans to establish a trading post and other connections in the region, though this was lost to them as part of losing the Seven Years' War with Britain. Dearborn was established in 1836, named after Henry Dearborn, a general in the Revolutionary War. It was incorporated in 1893. Today, Dearborn is home to several prestigious museums, including The Henry Ford, and The Arab American National Museum.

Dearborn is the often thought of as the Arab-American capital of the nation. Like other towns with large ethnic enclaves, this town has grown to house a large group of Arab Americans who either immigrated here, or were born there. Immigration began in the first half of the 20th century, with most people coming to work in the auto industry.

While not all Arabs are Muslims, many of them are, which makes Dearborn the city with the second largest Muslim American population, behind New York City. With this comes a lot of fear and misinformation by some people. The internet is rife with it. Contrary to popular internet belief, Sharia Law has not taken root and is not the "law of the land" in Dearborn. It is not the hub of ISIS in America, nor is it where terrorists are born and bred. For the most part, it is home to people who merely wish to be left alone to practice their religious beliefs in peace. There is also a certain amount of harassment they must endure as well, unfortunately. One popular story on the internet shows a video of white Christians being "stoned" by "cruel" and "aggressive" Muslims as they are driven out of a community festival. What the video doesn't show, however, are the protest signs filled with words of hatred and messages about "burning in hell", etc. The video does show people throwing empty pop cans and water bottles and driving the protestors back out of the festival with very little assistance from the police, from whom the protestors demanded help. However right or wrong it may be to counteract hateful protestors who are harassing you and your community, one does need to see the entire story in its proper context before passing judgement on a huge section of the American population.

So, you might be asking me right now, why Dearborn, and why now? I have been looking forward to this post since I started this blog. This past Friday night marked the beginning of Eid al Fitr, the huge celebration at the end of Ramadan. Ramadan is the month of fasting that most Muslims participate in. During this time, no food or liquid may be consumed during daylight hours. Imagine what that must be like, particularly in the hot summertime. Ramadan occurs at different times each year, but this year it took place in the super hot summer. This is dedication! While there are many different ethnic groups who are predominantly Muslim, I wanted to focus on Middle Eastern food because I love it so much and haven't cooked it in a very long time. Dearborn fit into this perfectly, and with Eid falling on the actual day I planned on doing the post for it, I couldn't resist. Though I did not partake in the fasting, I did partake in the feasting, and so, I present to you...

The Food: Middle East Feast

This ended up being one of my favorite meals so far. When this project is over, I will go through it and pick my top ten meals and favorite dishes, etc. This one is guaranteed to be in my top ten. It was just that good. It was also one of, if not the most labor intensive meals I've done so far. Many of the posts I've done have been crockpot meals or simple dishes, but this one took hours over the course of two days to prepare and I loved every second of it. I made three dishes- an entree, a side, and a dessert.

This post also marks a first for me in that I went to a family gathering and shared my food with my family. Many of them read this blog but have never had a chance to actually try the food, and this was their chance to taste some of it, finally. I'm glad it all turned out as well as it did because I had an audience to impress! They seemed to like it all, or at least they were very polite and ate it anyway!

Shish Tawook:


This entree was a last-minute thing because I was going to have access to an actual grill and wanted to take advantage of it. It is a flavorful dish, and I really enjoyed it. Grilled chicken skewers that were marinated in a yogurt-based marinade. There were tons of spices and lemon juice and it was just fantastic! The recipe comes from the internet and I didn't alter it at all. I will share the link in my sources section at the end, but I won't type it out here.


Fatoosh Salad:
Salad:
1 large pita bread(I tripled this recipe and ended up using the entire package of pita bread even though it was more than it called for.)
2 cups finely torn romaine lettuce, lightly packed(I used a combo of romaine and Boston lettuce and I liked the contrast of colors and textures.)
2 ripe tomatoes, chopped(Even though I tripled the recipe, I only used this amount and it was fine.)
1 small cucumber, peeled, seeded, and chopped(I used one regular-sized English cucumber. I did not peel it though I did seed and chop it.)
2 green onions, thinly sliced
2 Tbsp. minced parsley(I skipped this)
1/2-1 tsp. oregano(The recipe doesn't specify fresh or dry and I didn't want to spend the money on fresh so I actually used dried and put it in with the dressing. I would recommend doing this if you plan on using dried.)
Dressing:
2 Tbsp. lemon juice(Fresh-squeezed really is best for this one.)
2 Tbsp. olive oil
1/2 tsp. crushed garlic
Pinch salt/pepper

For Salad: Slice the pita bread into 8 triangles. Separate each triangle in half, creating 16 pieces total. Place on a baking sheet and toast briefly under the broiler, just until crisp and lightly brown. Watch closely so the bread does not burn. (Will only take a few minutes.) Break the triangles into large pieces and set aside. Combine the remaining salad ingredients in a large bowl.
For Dressing: Combine the lemon juice, olive oil, garlic, salt, and pepper(Summer's Note: And add the oregano here if using dried) to taste in a small bowl, and whisk until well combined. Pour over the salad and toss gently. Add the toasted pita pieces just before serving and toss once more. Serve at once.

Makes 4 servings; 142 calories, 8 g. fat, 3 g. fiber

This salad was fabulous! It's sort of a Middle East version of a Panzanella, the Italian bread salad. Since I was making this to take to a gathering, I had to prep everything and put them in separate containers and assemble it at the party. I transported the lettuce in that bowl and had the dressing in a carefully sealed container that I would be able to shake to mix the dressing. Everything was carefully packaged to prevent spilling and it turned out wonderfully! The lemon is tart but not overwhelming. It's really light and refreshing. I highly recommend this salad!

Ma'amoul-Date-filled Cookies:
1/4 cup orange blossom water(Available at Middle Eastern grocery stores though I found mine at the HT Market out on Aurora next to Oaktree Cinema. Do not use the smaller bottles that can be found in some alcohol sections of grocery stores as this is essentially orange extract. What you need is the type made from actual water and orange blossoms. Believe me, I know the struggle of finding this but it's worth it. I went to four stores before finding it and after buying the wrong kind first. If you know of a store that sells rose water, chances are they sell this too. Try that place first.)
2 cups flour
1 cup semolina
1 Tbsp. sugar
1/2 tsp. salt
1 cup butter, cubed
1 1/2 cups pitted dates, chopped
2 Tbsp. powdered sugar

*In a small bowl, combine orange blossom water with 1/3 cup water. Refrigerate for 5 minutes.
*In a large bowl, whisk together flour, semolina, sugar, and salt. Using pastry blender, cut in butter until mixture resembles fine bread crumbs; drizzle orange blossom water over flour mixture, stirring briskly with fork until dough holds together. Form into ball; press into disc. Wrap in plastic and refrigerate until firm, about 15 minutes. (Can be refrigerated up to 3 days.)
*Meanwhile, in saucepan over medium-high heat, bring dates and 1 cup water to boil. Reduce heat and simmer until thickened and smooth; about 5 minutes. Let cool. (Summer's note: This can be done ahead of time as well. Just reheat over low heat until the chill is gone when you go to fill the cookies. Keep covered in the pan in fridge or put in a leftover container and refrigerate.)
*Drop dough by 2 Tbsp. onto waxed-paper-lined baking sheet to make 26 mounds. (Summer's note: I didn't measure this, I just pulled the dough into 26 pieces and then pulled parts off the larger ones and added to the smaller ones to make sure they were all approximately the same size. The dough is very workable and forgiving so don't worry about overworking it.) Place 1 ball in palm of hand; press thumb halfway into center of ball, forming a cup shape to hold filling. Spoon in 1 tsp. filling; fold dough over filling and pinch edges to seal. (Summer's note: This did not work because there's not nearly enough space to put that much filling without it spilling out the edges when you try to seal it. What works better is this: Take the ball of dough in your hand and pat it down as thinly as possible so it resembles a small pizza dough, or a potsticker wrapper. Place the teaspoon of filling in a line along the center and fold dough in half. Seal the edges so it resembles a potsticker but place sealed-side down on the baking sheet.) Repeat with remaining balls and filling. Place, pinched side down and about 1" apart, on parchment paper-lined or greased baking sheets. Refrigerate until firm, about 15 minutes.
*Bake in center of 400 degree oven until bottoms are golden grown, 20-25 minutes. Transfer to rack. Dust with powdered sugar. (Summer's note: I did this in one turn with the oven. I put one rack on the top and one on the bottom and switched them halfway through baking and it did just fine. I found mine only needed about 19 minutes to cook, possibly because I'd had to stretch the dough thinner than it called for.)
Makes 26 cookies; 153 calories, 7 g. fat, 1 g. fiber


These were fantastic! I had a hard time not eating all of them myself. My family enjoyed them a lot as well, which surprised me since many of them don't like cooked fruit mixing with dessert products, generally speaking. So, they must really have been good! The flavor of the orange blossom water is difficult to describe. It's floral, but not overwhelming. It's not particularly orangey, but has a slight citrus flavor. I wouldn't recommend not using it and if you were inclined to try rose water instead, I would not use the amount listed in this recipe. Rose water is much stronger and way more overwhelming. I would cut it down to maybe a half teaspoon and regular water to make up the difference. I also think walnuts or pistachios would be an amazing addition to this cookie. Mixed in with the dates would be the natural place to put them.

This was an amazing meal and I'm so happy I got to share it with others! I love Middle Eastern food so all the hours I put into it, were spent in love and joy of the food. If you have never tried anything like these recipes, please try them out. You might just fall in love with a cuisine that has a rich, and very long history. You will be transported half way around the world, but remember, that it's also just as American as any other food I have celebrated here!

Sources:
Shish Tawook Recipe

City Info

City Map

City Pic

I am not going to post links to the hatred I found on the internet regarding the citizens of Dearborn. The video and story I referred to can easily be found online and I will leave that up to you to research if you are so incline. I choose to not spread hate, either on this blog or in my life in general.


Sunday, July 12, 2015

Dining-In: A Culinary Tour of America-Mesilla, New Mexico


 The Location: Mesilla, New Mexico

2013 census: 1,896 people; 48.2% Hispanic, 48.1% white. 2012 per capita income $34,206
Mesilla means "Little Tableland" in Spanish. Prior to the European invasion, the area was home to the Mansos and the Apache Indigenous peoples. The entire region was incorporated in 1848 when the Treaty of Guadalupe Hidalgo was signed, establishing the US border further south, which made Mesilla part of the United States. By 1850, the region was being colonized by the US, displacing the Apaches who were already living there. When the Apaches acted to defend their lands, the US government responded by building Fort Fillmore to fight against them. At this time, the US declared the whole area part of the United States, even though Mexico still claimed it as theirs. It took three years to settle the issue, but the United States eventually bought the land from Mexico, making it officially part of the US.

During the Civil War, Confederate troops from Texas invaded and the Union troops stationed at Ft. Fillmore surrendered. The Confederate troops took over the fort and Mesilla became the capital of the Confederate Territory of Arizona. In 1862, the Battle of Glorieta was fought and lost by the Confederates, forcing them to retreat back to Texas, thus ending Mesilla's involvement in the war.

During the time of the Wild West, Mesilla was a commercial and social hub. Events such as stage plays, cockfighting and bullfights were lively draws to the city. The clientele coming to such events were known for their lawlessness and the city was a rather violent place to live. People like Pancho Villa and Billy the Kid were known to frequent the town. Two stagecoach lines went through Mesilla, making it easy to get to.

When the railroad was coming through the territory, Mesilla bid for it but bid too high and it went to Las Cruces instead. The commercial and social dominance of the region was then shifted to Las Cruces and Mesilla had very little growth after that point. Because the people who live there still wanted to keep the flavor of history, much of the town was carefully preserved or rebuilt to look like it had in the 1800's and today it is known for its tourist appeal because of this. Each year the city holds large Cinco de Mayo and El Dia de Los Muertos celebrations which draw many tourists to the town.

The Food: Posole

Normally I would wax poetic about the history of the dish I made, but what I discovered made me so uncomfortable that I am actually not going to write about it here. If you want to know, you can easily find it on the internet, but do so at your own risk. The basic history, though, is this: Posole comes from Mexico and has a very long history that goes back to ancient times. It was a dish eaten in ritualistic fashion for spiritual ceremonies and though it is still very popular now, the recipe has changed over the years.

Posole is essentially a meat, chile, and hominy stew. This is the first time I have ever eaten hominy and I have been looking forward to trying it for a long time. It did not disappoint. The flavor and texture of hominy is fantastic! It tasted like eating corn tortillas in little nugget form. It's chewy and filling and acts as the starch in the dish. At first I was concerned that such a simple recipe would be enough to work for an entire meal. The hominy is definitely enough to fill you up. Though I did dip a flour tortilla in the sauce and that was lovely too. And because New Mexico is known for their chiles, I wanted to feature a dish that used them, and this dish did just that. In fact, the chiles and sauces I bought came from New Mexico, which made it feel extra special to me.

 I had a basic recipe I found and a couple recipe cards of my own but I really just turned this into my own dish. I will share the link of the base recipe but type out what I did. This was really easy and I did it in the crockpot so it was even easier! I got a late start but it still ended up being done in a few hours anyway. It was a bit spicy, so you might cut back on the spices I added if you like less spice. Here's the recipe:

Summer's Crockpot Posole-
1 (25oz) can hominy, drained and rinsed
1 (15 oz) can green enchilada sauce
1 (15 oz) can red enchilada sauce
1 (4oz) can diced mild green chiles
1/2 onion, diced
3 cloves garlic, chopped
3/4 lb. pork spare ribs, trimmed of fat, diced in bite-sized pieces
1(ish) Tbsp. canola oil
1(ish) tsp. chili powder
1/4 tsp. cayenne pepper
Salt/Pepper to taste
Cilantro-You might think this is a travesty, but I used dried cilantro because I am one of those cilantro haters. However, I don't hate the taste as much as I cannot stomach the smell, so dried cilantro fixed that issue for me. I didn't have to chop any, but I got a bit of the flavor, but not so much that it ruined it for me. You are more than welcome to use fresh if you like, but if you do, add this to the crockpot about a half hour or so before you'll be serving the posole. You can also use it as a topping for the dish too.

In a frying pan, saute the onions and garlic until softened. Add the pork and brown on all sides. Add chili powder, cayenne pepper and salt and pepper to taste. Mix well.

Pour the hominy, enchilada sauces, and green chiles into the insert of a crockpot. Rinse out the inside of the cans with water and add this to the crockpot. When the meat is browned, pour the contents of the frying pan into the crockpot as well. Stir well and put the lid on it. Turn it on high for about 3 hours. This makes 4 servings.

This was such a delicious meal and it was so easy to make. I think the hominy was the best part and I really need to research other dishes for it because I could see myself eating that all the time now. If you like spicy foods, you will like this. And if you prefer one of the colors of enchilada sauce over the other, you can absolutely use all of one or the other. I just couldn't make up my mind so I did one of each. I highly recommend dipping tortillas in the sauce. It's really good that way! If it's too spicy for you, I suppose you could mix in some sour cream to cut the heat a bit, but I didn't try that. If you try it like that, you'll have to let me know what you think!

Sources:
City History

Basic Recipe

City Pic

City Map-Note, the blue is Mexico, not the ocean.

City Info


Sunday, June 28, 2015

Dining-In: A Culinary Tour of America-Macon, Georgia

The Location: Macon, Georgia


2013 Census: 89,981 people. 66.0% African American, 28.2% white. 2012 per capita income $14,446.

Macon was built on the Ocmulgee Old Fields, part of the ceremonial mounds built in the Mississippi River region. After the Mississippian culture was wiped out during the "Little Ice Age" prior to the 16th century, the Creek Indians settled in the area. During the early 1800's, the US government built a fort, around which the city was built. The city was chartered in 1823 and named after Nathaniel Macon, a North Carolina statesman who was one of the first people to settle in the area.

The city's location along the Ocmulgee River made it ideal for business. Cotton was the main export. Macon was in what is known as the "Black Belt," the region where cotton was grown and produced and picked by slave labor. In 1843, the railroad came to Macon, increasing trading opportunities.

During the Civil War, the city was used as an official Confederate arsenal and prison for Union army members who were captured. The city was spared, however, from Sherman's March to the Sea. Towards the end of the war, the city was captured by the Union Army in Wilson's Raid. After the war, Macon remained an economic and transportation hub for the entire state and developed a strong textile industry.

Macon was successfully desegregated during the Civil Rights movement of the 1960's, without any loss of life or violence. To this day it remains a well-integrated city. The first African American mayor, C. Jack Ellis, was elected in 1999.

Several musicians hail from Macon. Among them are: Little Richard, the Allman Brothers Band, and Otis Redding.

Cool Factoid: In 1836, the Wesleyan College was opened in Macon by the Georgia Conference of the Methodist Episcopal Church. It was the first university in the United States to give degrees to women.

The Food: Glitter Peach Pie and Nectarine-Raspberry Tart

You cannot separate the connection between the South and the peach. Though it has had a long and illustrious history since its origins in China, the peach has long been synonymous with the Southern United States. Why is this? Well the answer is pretty simple, really. When the Civil War ended and slavery was outlawed, cotton was too expensive and labor-intensive for many Southern farmers to continue producing, so they looked to other commodities to grow. The peach required much less work to produce and the soil in the region was conducive to growing them. Many switched over from cotton to peaches, making the state a top peach producer. Peaches are also grown in several other states, in even larger quantities, in fact, but they will forever remain a symbol of Georgia and the South.

In its own way, the peach could be looked at as a symbol of freedom and the ending of slavery in the South. That is how I choose to look at it.

To be honest, this was a very last minute change-up in my blog schedule. I had another state and a different meal planned, but due to the heat wave Seattle is currently in, I couldn't handle the thought of doing something that required a significant amount of time cooking on the stove. So, I looked around my recipe cards for dessert ideas that would fit in with the blog and found these two recipes that would fit perfectly for Georgia, a state I had not yet featured.

The first item a peach pie, I made last night. The original name on the recipe card is "Top-Crust Peach and Cardamom Pie". But as you'll see in the pictures, I had good reason to rename it. As usual, I will write it out exactly as the card says, but will put my own alterations in parentheses.

Glitter Peach Pie
Crust:
1 1/4 cups flour
1 1/2 tsp. sugar
1/4 tsp. salt
1/2 cup chilled butter, cut into 1/2" cubes
3 Tbsp. (or more) ice water (I found 3 Tbsp. to be perfect, but it depends on how humid it is in your area on the day you make it.)
Filling:
2 1/2lb. firm but ripe peaches, peeled, halved, pitted, sliced 1/2" thick
1/3 cup sugar(I replaced the sugar with unsweetened applesauce and it turned out just fine.)
2 Tbsp. cornstarch
2 tsp. lemon juice
1/4 tsp. cardamom
1 egg, beaten, for glaze
1 1/2 Tbsp. Turbinado sugar(I replaced this with orange-colored edible glitter which I sprinkled on after baking)

Crust: Blend flour, sugar, and salt in a food processor. Add butter; using on/off turns, process until mixture resembles very coarse meal. Add 3 Tbsp. ice water; process using on/off turns until moist clumps form, adding more ice water by teaspoonfuls if dough is dry. Turn dough out onto lightly floured work surface and knead briefly just until dough comes together, 4-5 turns. Flatten dough into disk; wrap in plastic and chill at least 1 hour. Can be made 1 day ahead. Keep chilled.

Line large baking sheet with parchment paper. Roll out dough on lightly floured work surface to 13" roll.(I found I had to let it sit out at room temperature for a while before it was pliable enough to roll.) Transfer dough round to prepared baking sheet and chill 20 minutes.(I actually did not do this step. I just rolled it out and went right to the next step and it turned out fine.) Using 2 1/2"-3" heart-shaped cookie cutter, cut out shapes from dough, spacing close together (leave cutouts on baking sheet).(I did not do this, I put them directly on the pie filling which I had made while the dough was chilling. This turned out just fine.) If necessary, remove dough scraps, reroll while preparing filling.(I ended up rerolling the scraps about 6 times to use it all up. I slipped the hearts in anywhere I could put them. You can make them more overlapped than you think. The dough makes a lot.)


Filling: Position rack in center of oven and preheat to 400 degrees. Place peach slices in medium bowl. Add sugar(or applesauce in my case), cornstarch, lemon juice, and cardamom and toss to coat. Transfer peach filling to a 9" diameter glass pie dish.

Carefully arrange cutouts atop filling in slightly overlapping concentric circles, starting at edge and working toward center, covering filling completely. Brush crust with beaten egg, then sprinkle with turbinado sugar.(I didn't add sugar, but I still brushed the crust with the glaze. That's what makes it look so brown and shiny when it bakes. Don't skip that if you skip the sugar.)


Place on rimmed baking sheet. Bake until crust is golden brown, peaches are tender, and juices are bubbling thickly at edges, about 45 minutes. Transfer pie to rack and cool at least 30 minutes.
Makes 8 servings

This isn't in the recipe, but I used edible orange glitter to sprinkle over the top to make it more festive. It's just been such a festive few days that I wanted my pie to reflect that. Here is a close-up of the glitter on the crust:

It's subtle, but it looks more shimmery in person. I thought of several alternative names for this peach pie. I thought maybe Pride Peach Pie or Love is Love Peach Pie, since it has the hearts on it. But Glitter Peach Pie was the name my sister liked best and it does sound the most "me". This pie was fantastic. I may always have to make my crusts like this from now on because it's just so much fun! I did find that the cardamom didn't really stand out too much, so I would probably double the amount it calls for if I make this again. I have never made homemade peach pie before and wow, was it worth the effort! And really it wasn't any harder than making an apple pie. If you can handle that, you can handle this. I've always been intimidated with pie crust, but this one worked really well. It turns out I'm an awesome pastry cook and I never knew it before!

And because I can't seem to do just one item for my blog entries, and because I had received some raspberries that were too mushy to be eaten easily with the instructions to use them up, I decided to test out another recipe as well. And don't worry that it's nectarine when my theme today is peaches. Nectarines are peaches. They're the same species, they just have a slightly different genetic makeup. And so, I give you:

Nectarine-Raspberry Tart with Cookie Crust:
Crust:
1 1/2 cups flour
1/2 cup + 1 Tbsp. sugar(I used 1/4 cup + 1/2 Tbsp.)
1/4 tsp. salt
1/2 cup cold butter
Filling:
2 lb. nectarines, sliced 1/2" thick(about 7 medium nectarines)
1/2 pt. fresh raspberries
3 Tbsp. instant tapioca
1/2 cup sugar(I substituted 1/2 cup applesauce and it worked just fine.)
1 Tbsp. fresh lemon juice
1/4 tsp. cinnamon
1/8 tsp. nutmeg

1.) Preheat the oven to 425 degrees. Grease a 10" springform pan.(I'm not sure what you could use to substitute this if you don't have one. It's a very tall item so it wouldn't fit in a cake pan or pie tin without spilling all over the place.)
2.) To make crust, in a medium bowl, stir together the flour, 1/2 cup of sugar, and the salt. With a pastry blender, cut in butter until mixture resembles small peas. Press 2/3 of the mixture into the bottom of the pan, reserving the remainder. Bake the crust for 10 minutes. Transfer to a wire rack to cool.
3.) To make filling, toss ingredients together in a large bowl and let stand for 10 minutes, stirring occasionally to slightly soften tapioca. Spoon filling evenly over crust. Bake for 20 minutes.


4.) Remove tart from oven and sprinkle with reserved crumb mixture and remaining 1 Tbsp. sugar. Bake for another 25 minutes, or until fruit is tender and crumb topping is golden brown. Serve warm or at room temperature. Tart may be stored at room temperature for up to 24 hours.
Makes 10 servings.
292 cal.
10 g. fat


I actually ran out of time last night to make this so I made it this morning. It's super easy to make this and the flavor was amazing! Even though I cut back on a lot of the added sugar, it's perfectly sweet. The nectarines and raspberries don't need much help in the sweet department. I can see how you might want whipped cream or ice cream to go on this, or the peach pie, but I don't think it was necessary. It's sweet and delicious without anything else.

Both of these desserts just scream "Summertime!" to me. I used my small tabletop oven to bake these so they didn't really heat up my apartment. I was really impressed with both of these recipes. The next time you want to try something a little bit different, give one or both of these a try. You won't regret it!

Sources:
City map

City pic

City Stats

City History

Civil Rights History

Peach History


Sunday, June 21, 2015

Dining-In: A Culinary Tour of America-Galveston, Texas

The Location: Galveston, Texas


2013 census: 48,733 people. Per capita income: $37,154. 45.2% white, 31.1% Hispanic.
The city was originally part of Mexico, and was named after Bernardo de Galvez y Madrid, the Count of Galvez in Spain. It was built in or around 1816 by a French pirate in order to help the newly-formed Republic of Mexico fight against the Spanish. The Port of Galveston was built in 1825 by the Congress of Mexico after winning their independence from Spain. During the Texas Revolution, it would be used by the Texas Navy and eventually became the capitol of the Republic of Texas. During the 19th century, it would become a vital port for commerce.

In 1900, a major hurricane came through the Port and an estimated 6,000-8,000 people were killed. It remains, to this date, the largest natural disaster in American history. After the hurricane, the Galveston Movement, an immigration plan to help repopulate the city and region, would bring in about 10,000 Jewish immigrants from Eastern Europe, as well as many Italians and Germans. It would permanently altar the racial background of the entire region.

During the 1920's and 1930's, tourism would become Galveston's major form of income, which remains so to this day. During Prohibition, Speak Easies and gambling houses would become a major draw to people. Add to this a robust sex industry that had been going on since the Civil War, and it was a winning combination. Since the 1950's, however, the tourism has become much more family-friendly...

During the Second World War, the Port would become home to a major Army-Air Corps base, which would also bring with it an increase in population and change the type of industries in the region. Today it is still well-known for its tourism, but the insurance and health care industry also contribute a lot to the city's success.

The Event: 150th anniversary of Juneteenth

What is "Juneteenth"? you may be asking yourself right now. And how can it be 150 years old and I've never heard of it before? Juneteenth is celebrated in some parts of the United States more than in others, so you might not have been exposed to it before. Juneteenth is a contraction of the words "June" and "Nineteenth" and represents the date of June 19, 1865. This date is significant because it is the day that Major General Gordon Granger, leader of the Union Army, reached Galveston, Texas on his mission to occupy the state of Texas at the behest of the federal government. While the 13th Amendment to the United States Constitution, the Emancipation Proclamation, and the end of the Civil War had all occurred already, some states were still holding out on freeing their slaves and needed the federal government to step in and force them to. Texas was one such hold-out. The last hold-out, in fact.

On June 19th 1865, Major General Granger made the announcement that slavery was over with and would no longer be tolerated or allowed. This was the last area in the country to free their slaves, so this event marks the true ending of slavery, something that the 13th Amendment, the Emancipation Proclamation, and the end of the Civil War, were all unable to do by themselves.

Juneteenth is a community celebration, with barbecues, parades, prayer services, and games being held to enjoy. It has had its ups and downs over the years. It lost popularity during the Great Depression since people couldn't afford to celebrate. But during the 1950's and 1960's, it had a resurgence due to the Civil Rights movement. In 1980, Texas became the first state to declare it a holiday. Today, nearly half the states in the country do this as well.

The Food: Two foods have become synonymous with Juneteenth: Barbecue and Strawberry Soda Pop, and that is what I made to honor the day. I'm not sure about the pop, but the idea behind the barbecue is that a, it's delicious, and b, it creates a pleasing smell that, when cooked outdoors, wafts up to the heavens. This wafting to the heavens is so that your ancestors can then partake in the meal and the celebration with you. Juneteenth is a day of remembering your loved ones, the ones who left too soon, and your ancestors. Particularly if you, or they, ever lived in a time when they were unfree. You celebrate your freedom with them as they look down on you from above. In a way it's almost like El Dia de Los Muertos that way. Connecting then and now through food. It's beautiful to me.

Strawberry Pop/Soda/Soda Pop
I tried to think of how to make homemade soda pop without using sugar or corn syrup, so I looked around the internet for recipes that I could alter. I found a generic one using a simple syrup flavored with strawberries that you then add to sparkling water. This made me think about making my own syrup without adding sugar. I didn't bother to keep track of the original recipe since I would be turning it entirely into my own. I think it turned out pretty tasty! I used a recipe I've done before for one of my "pie bites" I like to make, using strawberries and lime juice to create a strongly-flavored fruit pulp. It's so easy it's ridiculous. Here's how to do it:

In a small frying pan, with a box grater, use the side with the smallest shred and grate 4-5 very ripe strawberries, leaving out the leaves. This will basically create strawberry pulp. Heat it over medium-low heat until most of the water has evaporated and it's concentrated to a thick paste. Add a few squirts of lime juice and mix.

Put a spoonful at the bottom of a glass and top it with sparkling water, or club soda and stir. The strawberry mixture is flavorful enough to flavor the entire glass and color it as well, but you've added no sugar to it besides what was in the berries. This amount of fruit paste is enough for two servings. Increase the amount based on however much you need to make. It is really delicious!


BBQ-
I made two, actually three recipes for this one, and tried it out on two separate cuts of meat with two different cooking methods. I think they both turned out really great!

Citrus Roundup BBQ Rub-if I recall correctly, this came from a Disney Insider email and is what they use at the BBQ place in Disneyland. I will write it out exactly as it's written, but will put in notes of what I changed for myself.

2 1/2 tsp. lemon pepper
2 Tbsp. seasoning salt
2 Tbsp. paprika
1 Tbsp. sugar(I reduced this down to 1/2 Tbsp.)
1 Tbsp. brown sugar(I reduced this down to 1/2 Tbsp.)
1 Tbsp. ground cumin(I reduced this down to about 1/2 tsp. because I really don't like a strong cumin taste, but that's just my personal preference.)
1 Tbsp. chili powder
1 Tbsp. garlic powder
1 Tbsp. onion powder
1/4 tsp. cayenne pepper

Combine all ingredients in a medium bowl. Stir to combine.

That's it for that recipe. I used it to coat a small rack of baby back ribs and baked them in an oven. I put them in a shallow dish, put water in the bottom, covered with foil and baked it for about 2 hours. I turned the ribs and put in more water half way through. The seasoning flavored the water to create a bit of a jus that I spooned over the ribs when I served them. I think this worked out pretty well, though I think the seasoning was a bit too thick. Next time I would use less. The flavors were fine, but the seasoning created a thick crust I didn't care for. And the recipe makes enough for leftovers, so you can use this on other things too if you make it. It should keep at room temperature for quite some time, so make it once and keep it until it's gone. It was really simple but delicious!

BBQ Sauce for Chicken or Pork
This was also a recipe card, though I don't know the source, unfortunately.
1 Tbsp. olive oil
1 medium onion, chopped
2 Tbsp. grated, peeled ginger
3/4 cup chili sauce(I found a recipe, the link will be in my sources, and made the chili sauce by scratch. The only alteration I made to the recipe was to cut the sugar listed in half. Feel free to use commercially-prepared chili sauce if you'd rather.)
1/2 cup ketchup(I don't eat ketchup anymore and used 1/2 cup tomato sauce and it turned out just fine)
1 Tbsp. sugar(I reduced this to 1/2Tbsp.)
2 Tbsp. cider vinegar
2 Tbsp. soy sauce(I used reduced sodium)
1 tsp. Worcestershire sauce

1.) In nonstick 10" skillet, heat over medium heat. Add onion and ginger; cook 10 minutes or until onion is tender and lightly browned.
2.) Stir in chili sauce, ketchup, sugar, vinegar, soy sauce, Worcestershire, and 1/3 cup water.(I actually didn't see this part about the water and didn't add it. I think it was just fine without probably because I used tomato sauce instead of ketchup. Ketchup is thicker and would need to be watered down. If you use tomato sauce like I did, I wouldn't recommend adding the water. It would be too watered down.) Cook 5 minutes, partially covered, to blend flavors.
3.) Brush sauce onto spare ribs, pork roast, or chicken during last few minutes of cooking. (Makes enough for 4 lb. spare ribs or 2 chickens.) Cover and refrigerate sauce if not using right away. Sauce will keep up to 1 week in refrigerator or up to 2 months in freezer.
Makes about 2 cups. Per 1/4 cup: 70 calories, 2 g. fat

I made the sauce ahead of time but didn't have time to saute the onion or ginger, so I did that after I got home from the birthday party I had attended yesterday. Once the sauce was assembled, I place a few spare ribs in my crockpot and covered it with the sauce. Not all of it, but just enough to cover it. I cooked it on high for several hours and it came out amazing! Though, I think it needed a bit more vinegar for my tastes. Next time I'd add more vinegar. The meat was flavorful and tender and I used the sauce to cover the plain rice I had made to accompany it. This was a winner dinner! I highly recommend trying these recipes out. The sauce and rub made enough that I might have to use them again for the 4th of July.


Sources:
City Map

City Info

City Pic

Homemade Chili Sauce Recipe

Juneteenth History

 More Juneteenth History

Sunday, June 14, 2015

Dining-In: A Culinary Tour of America-Fairmont, West Virginia


The Location: Fairmont, West Virginia


According to the 2010 census, there are 18,704 people living in this city. The 2012 per capita income was $21,093. 88.6% of the population is white, and 8.7% is black.
Interesting Factoid: Mary Lou Retton is from this city! How cool is that?!

The city was established in 1820 as Middletown, but the name was changed to Fairmont in 1843 when it was chartered by the Virginia General Assembly.

Like many towns in West Virginia, Fairmont is a coal mining town. In December of 1907, there was an explosion in two mines that triggered an earthquake large enough to be felt up to eight miles away. It destroyed buildings in the area, and knocked railcars off their rails. The explosions killed 362 people and remains, to this day, the largest mining disaster in the history of the nation.

Coal mining also leads into the food I chose. It is so synonymous with the state of West Virginia that it also informs the culinary dishes of the area too.

The Food: Pepperoni Rolls

Fairmont is the home of "The Original Pepperoni Roll". They were invented in 1927, by Guiseppe Argiro, an Italian immigrant who had come to America several years earlier to make a living. He had worked as a coal miner, and saw that one of the most popular meals the men ate during their lunches was bread and pepperoni sticks. He had an idea to combine them into one dish that could be eaten with one hand. By 1927, he worked in a bakery where he was able to develop this recipe. It ended up being a huge hit with coal miners. The pepperoni roll was easy to transport and easy to eat in one hand. Like a calzone, pierogi, or a pasty, it is a bread item encasing a filling, which is a classic food preparation that nearly every culture uses in their own way. The bread acts as a transportation device for the filling, yet also provides nourishment.

When I was researching this state, this dish came up over and over again so I knew I had to try it. The dish was popular when it was first introduced and remains so popular even today, that it was named as the state dish. That is quite an honor!

The recipe is ridiculously simple, and I happened to have all the ingredients on hand, which is really nice! You may not realize this, but this blog project is rather expensive, so having all the ingredients already, is quite appealing! I found a recipe online that called for frozen bread dough, which I had leftover from when I made runzas for the state of Nebraska earlier this year. You may recall that as another bread and meat-filling dish, akin to the pepperoni roll. The flavors, however, are nothing alike.

While runzas were made as individual items, the pepperoni roll was made as one large roll and cut into slices. Recipes vary, some of them are individual rolls, and some of them are slices, almost like a bread and meat strudel. Some recipes are very simple, just bread and pepperoni sticks, while some are more complex, by adding cheese or using a different form of pepperoni. The recipe I used called for pepperoni slices, and that's why I opted for it. There is one brand of pepperoni, Applegate, that has an all-pork recipe, so I can eat it since I don't eat beef and most pepperoni is a blend of pork and beef. I highly recommend this brand because it's super delicious!


The first step is to thaw the bread dough. If you follow the package directions, you take one of the dough pieces out of the package and put it in a greased loaf pan and leave it in the fridge all day to thaw out. I did this and it worked perfectly. However, I should have let it come to room temperature before I started kneading it. I didn't and I think that made it rather difficult to stretch out properly. It kept going back to its original shape and I had to work it for quite a while before it would stay in that slightly rectangular shape. The original recipe says to cut the dough into two and basically make two smaller rolls. Since some of the dough was too tough to use(freezer burn is no fun!), I had picked off the tough parts, but the rest was just fine. I thought since it was less than originally called for, I didn't need to cut it in half. I don't think it suffered at all, really. One large or two smaller, it still ends up the same when it's baked!

The next step, once the bread is in the right shape, is to lay out mozzarella cheese slices on top of the dough, slightly overlapping and leaving a bit of a gap around all the edges, like you would a pizza. On top of that, lay out the pepperoni slices. That's it for the ingredients. Seriously, it's three ingredients!

The next step is to then roll it up like a cinnamon roll or a strudel. Start at the far long end and begin rolling it towards you. It holds up better than you would imagine. Seal all the edges when you're done and move it onto a greased or parchment paper-lined baking sheet.


Bake it at 350 degrees for about a half hour. It should be golden brown when it's done. Some of the cheese and grease from the pepperoni might spill out of the bread when it's baking, but it's ok. This is perfectly normal. Let it sit for a few minutes before cutting it into slices.


I served this with a little bit of spaghetti sauce for dipping. These were ridiculously good. So simple with the ingredients used, but the flavors are so bold. They all shine-the bread is distinct from the cheese, which isn't drowned out by the pepperoni. It's really rich because there isn't the tomato sauce in it to interact with the flavors like a traditional pizza. I also ate a slice this morning for breakfast after it had chilled overnight and it was almost better cold. I can see why this would be an ideal meal for somebody taking food in a lunch pail for later in the day in a coal mine. It really is a one-hand dish, no utensils required. When it's chilled, nothing spills, it holds together entirely. It sounds so simple, but this was really a revelation to me in how amazing something can taste when there's nothing fancy involved. I can totally see why this is the state dish.

I did not make a side dish with this. I was unable to come up with any definitive sides from West Virginia that weren't generically "Southern", and I wasn't terribly hungry, so I just had some Pirate Booty to round out the meal.

This would be something that somebody without a lot of experience cooking or baking could easily make. It's hard to mess up. It would also be something fun to cook with children. They could help roll out the dough and lay down the cheese and pepperoni. Older kids would be able to help roll it up. I highly recommend this one!

Sources:

Pepperoni Roll Recipe

Pepperoni Roll History

City Pic

City Map

City Stats

Mining History

City History

State Dish Info


Sunday, June 7, 2015

Dining-In: A Culinary Tour of America-Murray, Utah

The Location: Murray, Utah

2013 Census: 48,612 people. 2012 per capita income: $28, 522. 83.4% of the population is white, 9.6% is Hispanic. 83% of the population is Mormon, 8.8% is Catholic.

Before being settled by Mormons in 1848, the region was the seasonal home to the Bannock, Paiute, Goshute, and Shoshone tribes of Native Americans. During its time, the Pony Express had a station in Murray. Throughout its early history, the region was used for agriculture exclusively, however in 1869, an ore deposit was found, and that quickly became the top economic factor for the region. Murray housed the first smelter in the area in 1870 and would remain the center of business for smelting for the next 30 years. In the mid 1880's, the railroad came through the state which increased business to the area.

Murray was officially named in 1883 after General Eli Murray, for whom the post office was named. It was officially incorporated on November 18, 1902. The smelting industry suffered greatly during the Great Depression, but the Second World War and the explosion of the automobile industry after the war would keep the city thriving in spite of that set back.

Cool factoid: Murray High School was used for filming the auditorium scenes in the first High School Musical movie.

The Historical Event: So why did I choose the state of Utah for this week? Well, June 6th is the anniversary of D-Day, a very important turning point during the Second World War. I was a history major who focused on that war, though mostly on homefront issues, as opposed to the warfront. However, D-Day is one of those events that draws you in, regardless. The strategy and tactics involved, the luck, and the huge loss of life make it a compelling story that needs to be retold. So what does this have to do with my choosing Utah? Well, the coastline of Normandy, France was divided into five separate pieces and given names: Utah, Omaha, Juno, Sword, and Gold. Utah and Omaha were the beaches that the Americans were responsible for. Juno, Sword, and Gold were under the responsibility of the British and Canadians. Because I have already done the state of Nebraska for this project, that left Utah!

Of the two American beaches, Omaha is the one overwhelmingly talked and written about. It had far more casualties than Utah, and far more difficult circumstances to overcome. But don't underestimate the importance of the storming of Utah beach. It was the farthest west of the five and the closest to the Port of Cherbourg, a major entry point into France that was being used and protected by the Axis powers. The Allies wanted to take it and use it to bring in their own troops. Utah beach was added after the other four beaches, when General Eisenhower realized it would be a good location to go in to take the port. Utah was about three miles long, approximately two miles shorter than Omaha. Due to the terrain, the German presence was not as strong here. During the course of the first day, over 20,000 troops would land here, 1700 vehicles would arrive, and there would be less than 300 casualties. Utah had the advantage of good timing as it was the first one stormed. It had the element of surprise on its side, a luxury that the other four beaches did not have. It also had the advantage and disadvantage of only having one major road to access the beach. While this made it more difficult for the Allies to travel further into France, it also made it more difficult for the Axis powers to get to the coast to protect it. The beach landings were preceded by an aerial landing just after midnight the morning of D-Day. It was a success and confused the Axis powers. Was this the assault they'd long anticipated? Or was it a mere distraction? It turned out to be both. Utah beach's landing is considered to be the most successful of the five beaches.

The Food: Jell-O and "Funeral" Potatoes
All right, that's enough history for one blog post. So, back to Murray, Utah and food. Jell-O is not a food I generally eat. I ate it as a child, but since I don't eat beef, that pretty much leaves out anything with gelatin in it, and since I don't really do sugar anymore, Jell-O is pretty much off the menu. But...Utah is the Jell-O capital of the country. More Jell-O is eaten per capita in that state than anywhere else in the nation, so I felt like I needed to honor this. And during my research one dish came up over and over again and the name was such that I couldn't just dismiss it. What the heck are "funeral" potatoes? This is a side dish that shows up at nearly every funeral, and church or community function there. It's easy to make in large quantities and isn't terribly expensive either. It's great for feeding large crowds. And it turns out it's a very similar side dish to a family recipe we eat every Christmas Eve called "patio" potatoes, but it was different enough that I tried it out anyway.

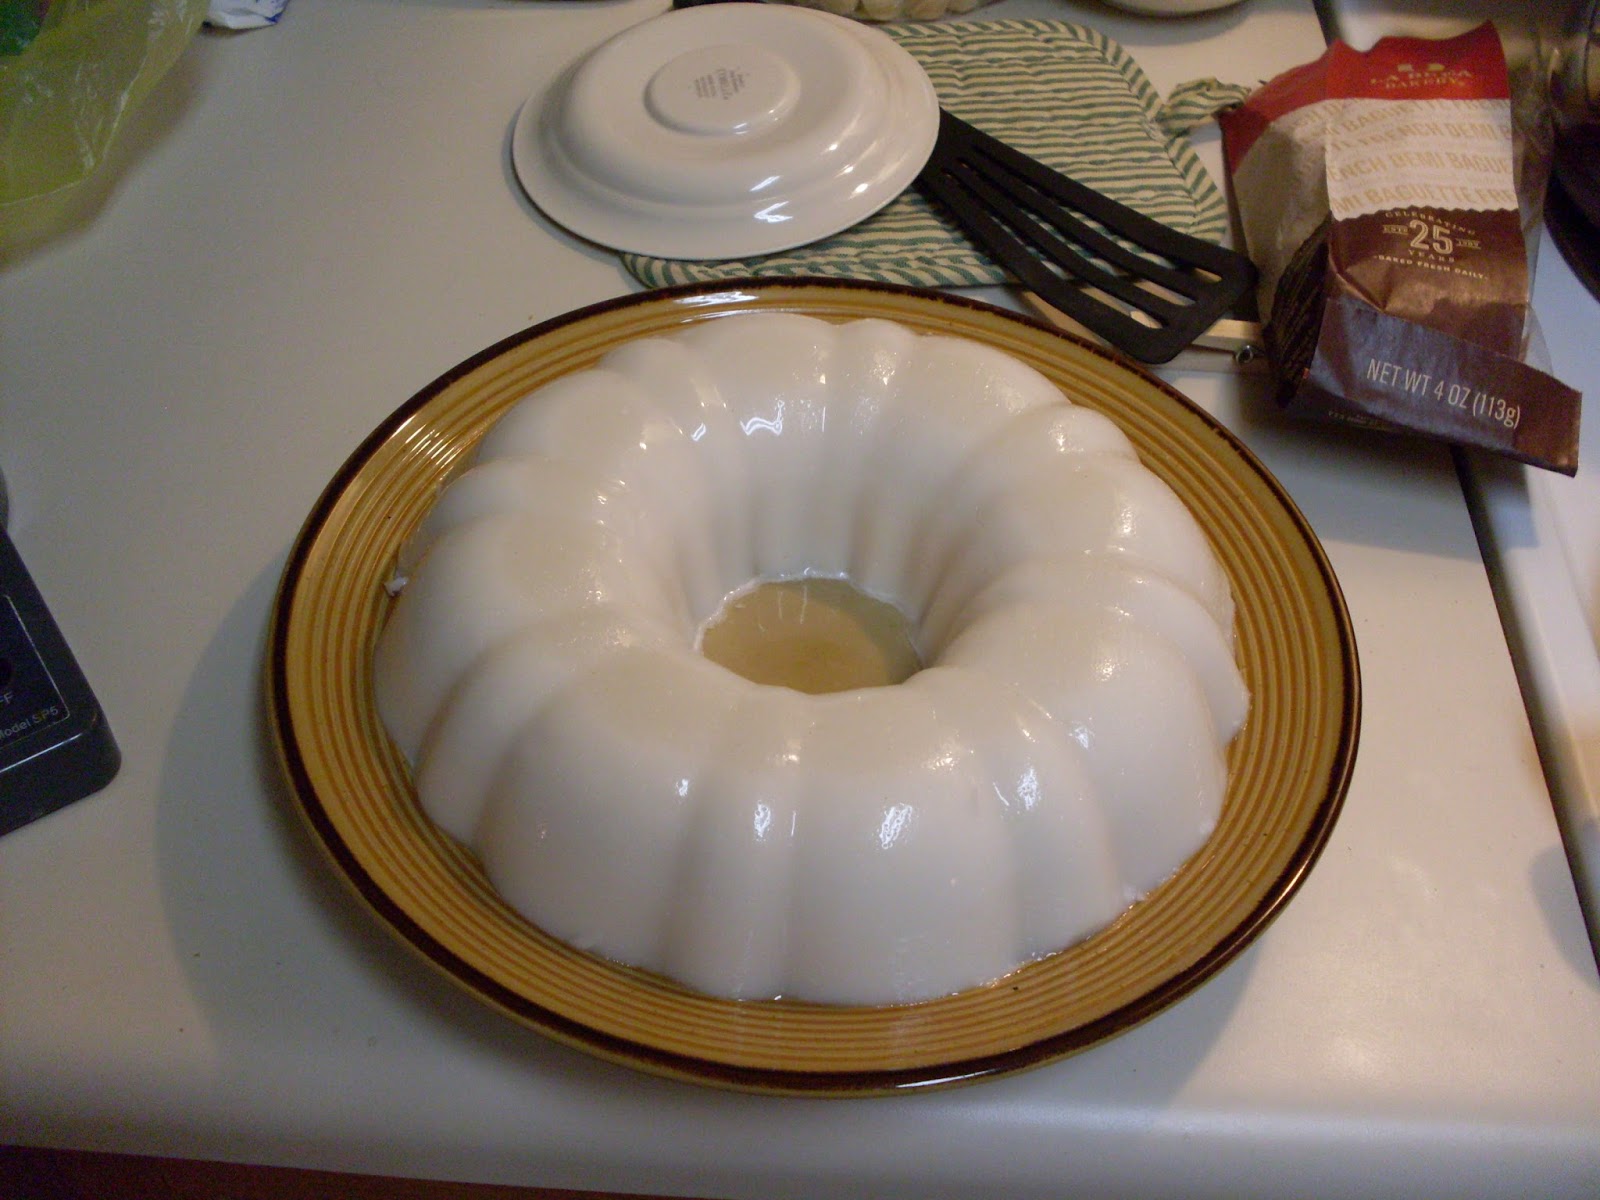
So, I looked up many Jell-O and Jell-O salad recipes to see if I could revamp it and make my own type of recipe. In the end I went to my local Asian grocery store and bought a package of Agar Agar. For those of you not familiar with this product, agar agar is a vegan, algae-based thickener that works in much the same way as gelatin. It has a higher gelling temperature which means you can keep it out at room temperature longer without worrying about it melting again, which is really lovely. I was only able to find a package with sugar in it, but I have heard that you can get just agar agar by itself, so if I was to pursue this, I would seek that out because that way I can control the sugar content better. I decided to make up a recipe with this while following the general directions on the packet. I used about 3 cups of light coconut milk(Trader Joe's brand) and 3 cups of water. For the last cup of water, I added 2 tsp. rose water to the cup and filled the rest with tap water. All of this was put in a large pan on the stove and brought up to a boil where I then added the packet of agar agar and let it simmer until it was all dissolved. I used a Bundt pan that I greased first and poured the liquid into it. I let it cool off a bit before placing it in the fridge. I did this in the morning so it would be ready for dessert in the evening.

I was nervous about it coming out of the mold and I used a spatula to loosen it up before overturning on the plate. It looks really cool! The flavor was ok, a bit too floral. I should have used half or a quarter the amount of rose water, but I do think it blended pretty nicely with the coconut flavor. However...the texture was a bit too chewy for my tastes. It's either how the agar agar works, or perhaps I needed to use less of it for the amount of liquid I used. There were two recipes on the box and I opted for the one with less liquid, because I was afraid it wouldn't gel enough. I think I should have used the one with more liquid and perhaps the texture would have been more Jell-O like. So, it wasn't a huge fail, and it did gel, so it was a success, just not a huge one either...This one needs more work, I think.

And now, to the potatoes, which my sister ate too and really liked. I made a half batch of what I was basing mine off of and made a few other changes, so I'll write out what I did, but will provide the link to the original recipe in my Sources at the end.

"Funeral" Potatoes:

16 oz. frozen shredded hashbrowns(Most packages in the store are bigger than this, so measure out 16 ounces from the larger bag and keep the rest for another use.)
1 can Cream of Potato soup(Cream of Mushroom would be great too.)
1 cup sour cream
3/4 cup shredded cheddar cheese
14 cup melted butter
1/4 cup chopped onion
1/2 cup panko
1/2 cup crushed potato chips
2 Tbsp. butter, melted

Grease a 9"x9" oven-proof dish and preheat the oven to 350 degrees. In a large bowl, mix the soup, sour cream, cheese, melted butter, and onion until well combined. (I found the onions too raw for my tastes when the dish was completed, so next time I would probably saute them in the butter first before adding it to the bowl and mixing with the rest of the ingredients.)

Add the frozen shredded hashbrowns(do not thaw first) and gently fold into the soup mixture until well combined. Spread this out in the greased dish.

Combine the panko and potato chips in a small bowl or on a plate and pour the melted butter into it. Mix until well combined and spread out evenly over the potatoes.

Bake for about 30 minutes or until the potatoes are cooked and everything is heated through.

This made about 6 servings, I'd say and was really easy and delicious. My sister thought it needed more cheese, and I'm inclined to agree with her. The sour cream was the strongest flavor. This is a new favorite of mine, I think. I do think it needs a happier name though...Potato Delight or something without the word funeral in it...I'll keep thinking. If you try this and like it, let me know! If you think of a better name for it, also let me know! But do try it, cuz I think you'll like it!

Sources:

Jell-O Consumption, I didn't just make it up!

Funeral Potatoes Recipe

City Info

City Pic

City Map

D-Day Map

Utah Beach History

More Utah Beach History