Sunday, February 28, 2021

The Baker's Dozen: Scottish Scones


The Baker's Dozen: Scottish Scones

Well, today's recipe was another success! If you like scones or oatmeal cookies, you'll love this one. It's the perfect combination of both of them! Here is the recipe:

Scottish Scones(Source Unknown)

1 1/2 cups flour

3/4 cup rolled oats

1/4 cup brown sugar

2 tsp. baking powder

1/2 tsp. salt

1 tsp. cinnamon

1/2 cup butter, softened

1/2 cup milk

Topping:

1 Tbsp. butter, melted

1 Tbsp. sugar

1 tsp. cinnamon

Heat oven to 350 degrees; grease cookie sheet. Mix all dry ingredients; cut in softened butter. Add milk and mix. Knead 6 times; press out into 6" circle on cookie sheet. Brush with melted butter; sprinkle with sugar and cinnamon. Cut into 8 wedges; bake 20-25 minutes.

Makes 8 scones.

All the ingredients, ready to go!
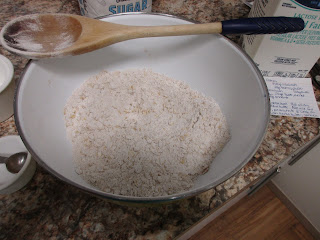
Here we have all the dry ingredients mixed together.
The butter is now mixed in, it's still pretty dry, as you can see.
This is after the milk is mixed in. It was still a little too sticky after I kneaded it, so I added a small handful of flour and kneaded it in. It was just perfect after that.
Melted butter and cinnamon-sugar always makes everything better!
I ended up needing more time than it called for. About a full half hour.

Here's a close-up of the inside of a scone. It looks like whole wheat because of the color, but it's from the brown sugar.

I love making scones because they look so fancy, but they are so easy to make! One bowl, very little to clean up afterwards. The payoff is so big with scones, it's hard to go wrong with them. The oats, the element that makes these scones Scottish, add a really nice chewiness to them too. I froze two so my parents can try them out, but basically, between my sister and I, we're down to one scone left tonight!

Definitely give these a try some day! If you like scones, oats, cinnamon-sugar, or baked goods in general, you'll love these!


Sunday, February 21, 2021

The Bakers's Dozen: Caramel-Glazed Apple Bread


The Baker's Dozen: Caramel-Glazed Apple Bread

OMG this was a winner! Such a winner that I already froze half of it to give to my parents because I'm scared I'll scarf the entire thing this week if I didn't. For such a simple recipe, it was really delicious! Here is the recipe:

Caramel-Glazed Apple Bread (Source Unknown)

Bread:

1 1/2 cups shredded peeled baking apples (2 large)

1 cup brown sugar

1/2 cup buttermilk

1/2 cup vegetable oil

4 eggs, lightly beaten

3 cups flour

1/2 cup chopped pecans

2 tsp. baking soda

2 tsp. cinnamon

1 tsp. salt

1 tsp. nutmeg

Glaze:

2 Tbsp. butter

1/4 cup brown sugar

1 Tbsp. milk

1/2 cup powdered sugar, sifted

1.) Heat oven to 350 degrees. Grease bottoms only of 2 loaf pans with cooking spray.

2.) In large bowl, stir together apples, 1 cup brown sugar, the buttermilk, oil, and eggs. Stir in remaining bread ingredients just until dry ingredients are moistened. Pour into pans.

3.) Bake 45-55 minutes or until toothpick tests clean. Cool 10 minutes on cooling rack. Loosen sides of loaves from pans; remove from pans and place top-sides-up on cooling rack. Cool completely, about 1 hour.

4.) In 1 qt. saucepan, melt butter over medium heat. Stir in 1/4 cup brown sugar. Heat to boiling, stirring constantly; reduce heat to low. Boil and stir 2 minutes. Stir in milk. Heat to boiling; remove from heat. Cool to lukewarm, about 30 minutes.

5.) Gradually stir powdered sugar into glaze mixture. Place saucepan of glaze in bowl of cold water. Beat with a spoon until smooth and thin enough to drizzle. If glaze becomes too stiff, stir in additional milk, 1/2 tsp. at a time, or heat over low heat, stirring constantly. Drizzle glaze over loaves. Wrap tightly and store at room temperature up to 4 days, or refrigerate up to 10 days.

Makes 2 loaves, 12 slices each. 200 calories, 8 g. fat, 1 g. fiber per slice

I actually cut this recipe in half. All the ingredients can easily be cut in half, so don't feel you have to make 2 loaves if you don't need that much. And as usual, I made my own buttermilk with vinegar and milk.
This is the wet ingredients mixed. It looks like a lot of liquid, more than a typical quick bread, but don't worry.

It all mixes together perfectly with the dry ingredients, as you can see! This is the final product.

The batter only goes up about half way. Even though it says not to grease the sides of the pan, I had problems getting it out of the pan once it was baked, so you might go ahead and grease the sides as well. It'll help you in the long run. I ended up baking it for about 48 minutes before it was perfectly done. I don't know why I didn't take any pictures of the finished product, but I didn't. Just know that it looks pretty much like any other quick bread.
Here is the beginning of the caramel sauce.
And the finished caramel sauce. I didn't use the cold water bath it calls for, but I definitely had to add more milk. It's slightly drizzly, but not like a glaze. It's more like a frosting, but I liked it that way.
I drizzled it over at first but decided I wanted it even over the entire top and spread it out like frosting.
Because I thought it looked a little drab without anything on top, I sprinkled more chopped pecans over the top, and it just worked perfectly.
Here is a cut slice. OMG this thing is so friggin' delicious! The bread by itself is rather plain. There's not much sugar in the bread, so the real sweetness comes from the frosting. People who know me well, know I'm not a frosting person, but this is stupid good! Make sure each bite has some of the frosting, and of course, all quick breads are best with some butter on it!

This would be a hit at a gathering or a work potluck. It's super easy to make. The frosting is a game changer. It would be good on banana bread, zucchini bread, pumpkin bread...Definitely give this one a try!


Sunday, February 14, 2021

The Baker's Dozen: Mary Berry's Mincemeat Loaf Cake


The Baker's Dozen: Mary Berry's Mincemeat Loaf Cake

So, this was a last minute change up. I had a recipe from my recipe collection but the instructions were essentially the same as last week's single-rise disaster, so I didn't want to do that again, knowing it most likely wouldn't work. I looked around at some of my other recipes but nothing stood out. I also have been wanting to use up some of my Christmas ingredients and have found some possible recipes to use up the jar of mincemeat in the fridge. One of them I selected was a quick bread recipe, which fits into this project, so I went with it. It's a snow weekend so I wasn't going to the store, and I happened to have all the ingredients here ready to go. I was able to use up the jar of mincemeat, as well as the rest of the green glaced cherries and made progress using up the red glaced cherries too, so it turned out to be a great way to use up ingredients! And since it's a snow weekend, it was fun to make a recipe that hearkens back to Christmas and made the apartment smell nice as it baked.

Since it's not my own recipe card, I won't type out the recipe. I'll paste the link to it here. Mary Berry is a famous British baker and was the star of several seasons of The Great British Bake Off, so it was fun to try her recipe and I am happy to say that it turned out really well!

I love it when the ingredients are all on hand! I didn't have the self-rising flour that it calls for, but it's very easy to find the proportions of how to make it yourself. Just google it rather than spend extra money on self-rising flour, especially if you don't use it that often.
Here is the mixed batter. I used the green glaced cherries instead of red because I wanted to use them up and wanted the red ones for the topping because I think they're prettier. They both taste the same.
It says you should put it in two regular loaf pans and I tried that but it was just too thin to even spread out on the bottom, really, so I combined them into one. It definitely adds time to the baking process, but it's worth it in the long run.

Here's my pretty topping design! I cut the cherries in half and set them into the top, then sprinkled the almonds around it all. I think it looks nice.

Post baking. I put foil on it towards the end to make sure it didn't over-brown as it continued to bake.
This bread really needs to cool before you cut into it. It was still warm when I cut into it and you can see how crumbly and almost gummy the texture is. I was worried that this was the final product.

But as you can see, it does cut very nicely once it's fully cooled. The texture firms up and holds up nicely. I highly recommend butter on it! It's very sweet, fruitcake-like, and tastes strongly like the mincemeat. This is a great quickbread! It would be so easy to make this at Christmas and take it to a party. It's basically "quick fruitcake." Mary Berry had a wonderful idea and it turned out perfectly!

If you like the flavor of mincemeat, you will love this. You have to be ok with cooked raisins, and I think leaving the glaced cherries out would be a mistake, though you could probably reduce the amount by half if you wanted. And use an online calculator to convert it from Metric to our measurements and do use a scale to make sure you get it exactly right. Measuring cups will be useless for this recipe.

Once you make sure all this is done, you'll be good to go! If you need a Christmas fix, this is your recipe! Give it a try!


Sunday, February 7, 2021

The Baker's Dozen: English Muffins in a Loaf


The Baker's Dozen: English Muffins in a Loaf

This week wasn't a fail, in terms of making and baking the bread, I would say, but it was a fail in terms of flavor. I was really excited to try this recipe out, because I love English muffins and thought it sounded like a fun and unique concept to have it in a bread loaf shape instead of their traditional shape. But it was just bland and boring when I tasted it. I won't be sharing the recipe, as I don't think the result was good enough to make again. I will taste it one more time tomorrow after it's had a lot of time to set up flavor-wise, but I might not even finish the loaf. It's just blah and boring. I was really disappointed, sadly. I will share the pictures and explain what I did.

The obligatory ingredient picture. Not much goes into this. The recipe calls for salt in the instructions, but it it not listed in the ingredient list, so I had to guess. Because the recipe also made two loaves and I only wanted to make half, I cut it all in half, which worked out fine. I just guestimated on the salt and added a pinch. Apparently it wasn't enough.
The buttered pan dusted with cornmeal.
Here is the first half of the dry ingredients mixed with the liquid.
And this is what the dough looks like after adding the rest of the flour. It's a nice dough. You don't knead it a lot.
I had to sort of press it and stretch it out a bit to fit it in the pan properly before setting it aside to rise.
Here it is after it's risen. Another unique element to this is that it only calls for one rise. I thought that might make it more like English muffins, but it made it super dense without much texture.
It got nice coloring. Called for 25 minutes, and that's what it needed.
A side shot after removing it from the pan.
And here is what it looks like from the inside. You can see there's just no definition. English muffins have some holes in them, and this has none. Probably because of the single rise. It toasted ok in the toaster, but it just was disappointingly boring, overall.

Oh well, they can't all be winners, I guess! And I learned something: yeast breads definitely need a second rise. And English muffins are probably best in their traditional form. They're shaped like that for a reason, clearly! Hopefully next week will be a success...!