Showing posts with label desserts. Show all posts

Sunday, December 11, 2016

Holiday Soiree: Hanukkah

The Holiday: Hanukkah(Worldwide)
So, it's early to be celebrating Hanukkah, but this year, it falls on the same day as Christmas, and those both fall on a weekend, making it difficult to do anything for this blog project on that weekend. Instead of skipping it this year, I am doing it early. So, Happy Hanukkah, everybody!

For those of you who are not familiar with this holiday, it is a Jewish holiday celebrating a rebellion in 200 BCE of the Jewish people against their oppressors. In this case, it was Antiochus III, of Greek-Syrian origin. It turns out that Antiochus was a jerkass, and made life unlivable for the Jewish people there. They rose up in protest, and what ensued was a seven year series of battles between them and Antiochus III. The famous story about the temple with the oil lasting eight days is a wonderful story, but it is also possibly within the realm of myth/legend. It's a fun story, and probably has some basis in a true historical event that has since been embellished upon.

The Food: Rugelach and Buñuelos/Bimuelos
Because of the traditional story about the temple with the miraculous oil, it is customary to eat fried foods at Hanukkah, and who am I to question tradition?!

Rugelach is a cookie that looks like a crescent roll, but with stuff inside it. It's amazing, if you've never had them before, you should try them out! I don't have a source for this recipe.

Rugelach
3 cups flour
1/4 tsp. salt
1/2 cup butter, softened
1(8oz.) pkg. cream cheese, softened(I used the 1/3 reduced-fat kind)
1 cup sugar, divided
2 egg yolks, room temp.
2 tsp. vanilla
1 cup finely chopped walnuts
2 Tbsp. cinnamon
1/2 cup seedless raspberry or apricot jam
1 cup raisins, divided

1.) Whisk flour and salt in bowl.
2.) Beat butter and cream cheese in mixer bowl until smooth. Beat in 1/2 cup sugar, yolks, and vanilla until combined.
On low speed, beat in flour mixture until dough holds together. Gather dough into a ball and divide into 4 equal pieces; shape each into a 6" disk. Wrap each disk; refrigerate overnight.
3.) Line a sheet pan with foil. Remove dough disks from refrigerator; let stand 10 minutes.
Combine walnuts, remaining sugar and cinnamon in bowl; set aside 1 cup in another bowl for filling. Roll one disk on cutting board between 2 sheets of waxed paper into a 10" circle about 1/8" thick. Remove top sheet, but leave on the bottom sheet.(I only did 1/4th of the dough. I froze the rest for Christmas/Hanukkah Eve with my family. I think replacing the bottom sheet of wax paper is a good idea because this allows you to make the mess of spreading stuff on this and cutting it and rolling it up on something you can just throw away when you're finished. It really cut down on the mess.)
Spread 2 Tbsp. jam evenly onto circle.
Sprinkle evenly with 1/4 cup nut filling. Cut dough into 16 wedges; sprinkle with 1/4 cup raisins over top.(I spread everything on it and then made the cuts, but do what works best for you.)
Tightly roll wedges up from outer edge to form a crescent. Gently toss in remaining nut mixture to coat.(I didn't do this, I sprinkled a little bit on top but didn't toss it in there. It was just so messy I didn't want to do that.) Arrange seam-side down on pan so that sides touch. Repeat process with remaining dough, and jam.
4.) Heat oven to 350 degrees. Bake 33-35 minutes(This is what the recipe says, but I found that alarmingly too long. I think I did mine for closer to 25 minutes, but test them at 20 and add time from there,) until golden. Cool in pan 5 minutes; transfer cookies to wire rack.
Makes 5 dozen. I sprinkled powdered sugar on these to make it look festive.

These are amazing!! I used leftover cranberry sauce that I made at Thanksgiving that still needed to be used up. The ones I will make for my family in a couple weeks will have strawberry jam, because that's the kind I have on hand. I have never made dough with cream cheese in it before and I think it's really tasty! The cookies are crunchy on the outside and soft on the inside. I hope the dough I froze will work ok when I thaw it out. Because I've never made it before, it's a risk, but it's been my experience that when a dough recipe has the refrigerate step, it can be frozen at that point and thawed out at another time. Time will tell, I suppose! I have a few of these to take to work for my coworkers to try, and I also gave some to my parents and grandparents too.

This was a fun cookie, but there's no frying involved. I have done latkes before and even made apple fritters once for Hanukkah, and needed something new and exciting. You may not know this about me, but I have a fascination with Jewish cuisine. As a history major with a focus on food, it's a match made in Heaven for me! I have never run across a people whose history is so steeped in everything they eat, more than Jewish people. Every dish seems to tell the story of who they are, and their past. So, because of this, I actually have several Jewish cuisine cookbooks, in spite of not being Jewish, myself. I looked through all of them, and found just the right thing in a book called, "A Drizzle of Honey: The Lives and Recipes of Spain's Secret Jews," by David M. Gitlitz and Linda Kay Davidson.

Did you know there is a group of Jewish people who settled in Spain? They are called Sephardic, and have a long history in the Iberian Peninsula. Once upon a time, the Muslims settled in the Iberian Peninsula, and ended up ruling there for over 800 years. During this time, they brought with them a lot of ingredients and cooking techniques that the region is still known for to this day. Also during this time, Muslims, Jews, and Christians lived together in a sort of peace. When the Christians eventually took over the region, they were less kind and expelled the Jews from the region. To work around this, many of them converted publicly to Christianity, but kept their own beliefs and traditions in their homes. Unfortunately, the Inquisition was at this same time period, and friends and family members were encouraged to turn each other in if they suspected them of heresy. Jewish traditions were considered a heresy. A lot of the recipes from this book come from people who were turned in and tortured by the Church. Many of them were burned at the stake.

This is why food is important. It tells a story after people are long gone and can no longer tell it for themselves. It keeps their history alive. Enjoy it, love it, have fun making, eating, and sharing it, but always be respectful of it. This is not my history, and the people who had to hide it from the world didn't have the luxury of being able to share it with others. So, enjoy the food, remember their history, and share both for them.

Buñuelos/Bimuelos(Found on page270-272 in the paperback copy of the book)
These are also popular in Mexican cuisine. The reason? Because the cultures blended over the years, a lot of what the Jewish people ate ended up being what the larger Christian population ate as well.

Dough:
1 pkg. dry yeast
1 1/3 cups warm water
3 cups unsifted white flour
2 eggs, well beaten
1/2 tsp. salt
1 Tbsp. olive oil

Syrup:
3 cups honey
1/4 cup water

Olive oil(enough to cover a deep pan to a depth of 1")

Topping:
Cinnamon
Powdered sugar

Mix the dough:
1. Dissolve the yeast in 1/3 cup warm water. Let sit for 10 minutes.
2. Place the flour into a medium bowl. Stir the yeasted water, the beaten eggs, salt, and olive oil into the flour all at once. Gradually add the remaining 1 cup water to make a slightly tacky dough.
 3. Cover and let rise in a warm place for 1 hour until doubled in bulk.

Make the syrup:
4. Mix the honey and water in a medium saucepan and bring to a hard boil. Reduce the heat to low. Simmer for 5 minutes and then turn down the heat to its minimum setting so that the syrup remains hot but does not boil again. (I used less honey than it called for. I actually didn't measure it or the water.)

Fry the fritters:
5. In a large deep skillet or saucepan, heat the olive oil to approximately 375 degrees or hot enough for a drop of water to sputter.
6. Dip a tablespoon into the oil to coat it. Dip out a scant teaspoon of the dough and drop it in the boiling oil.


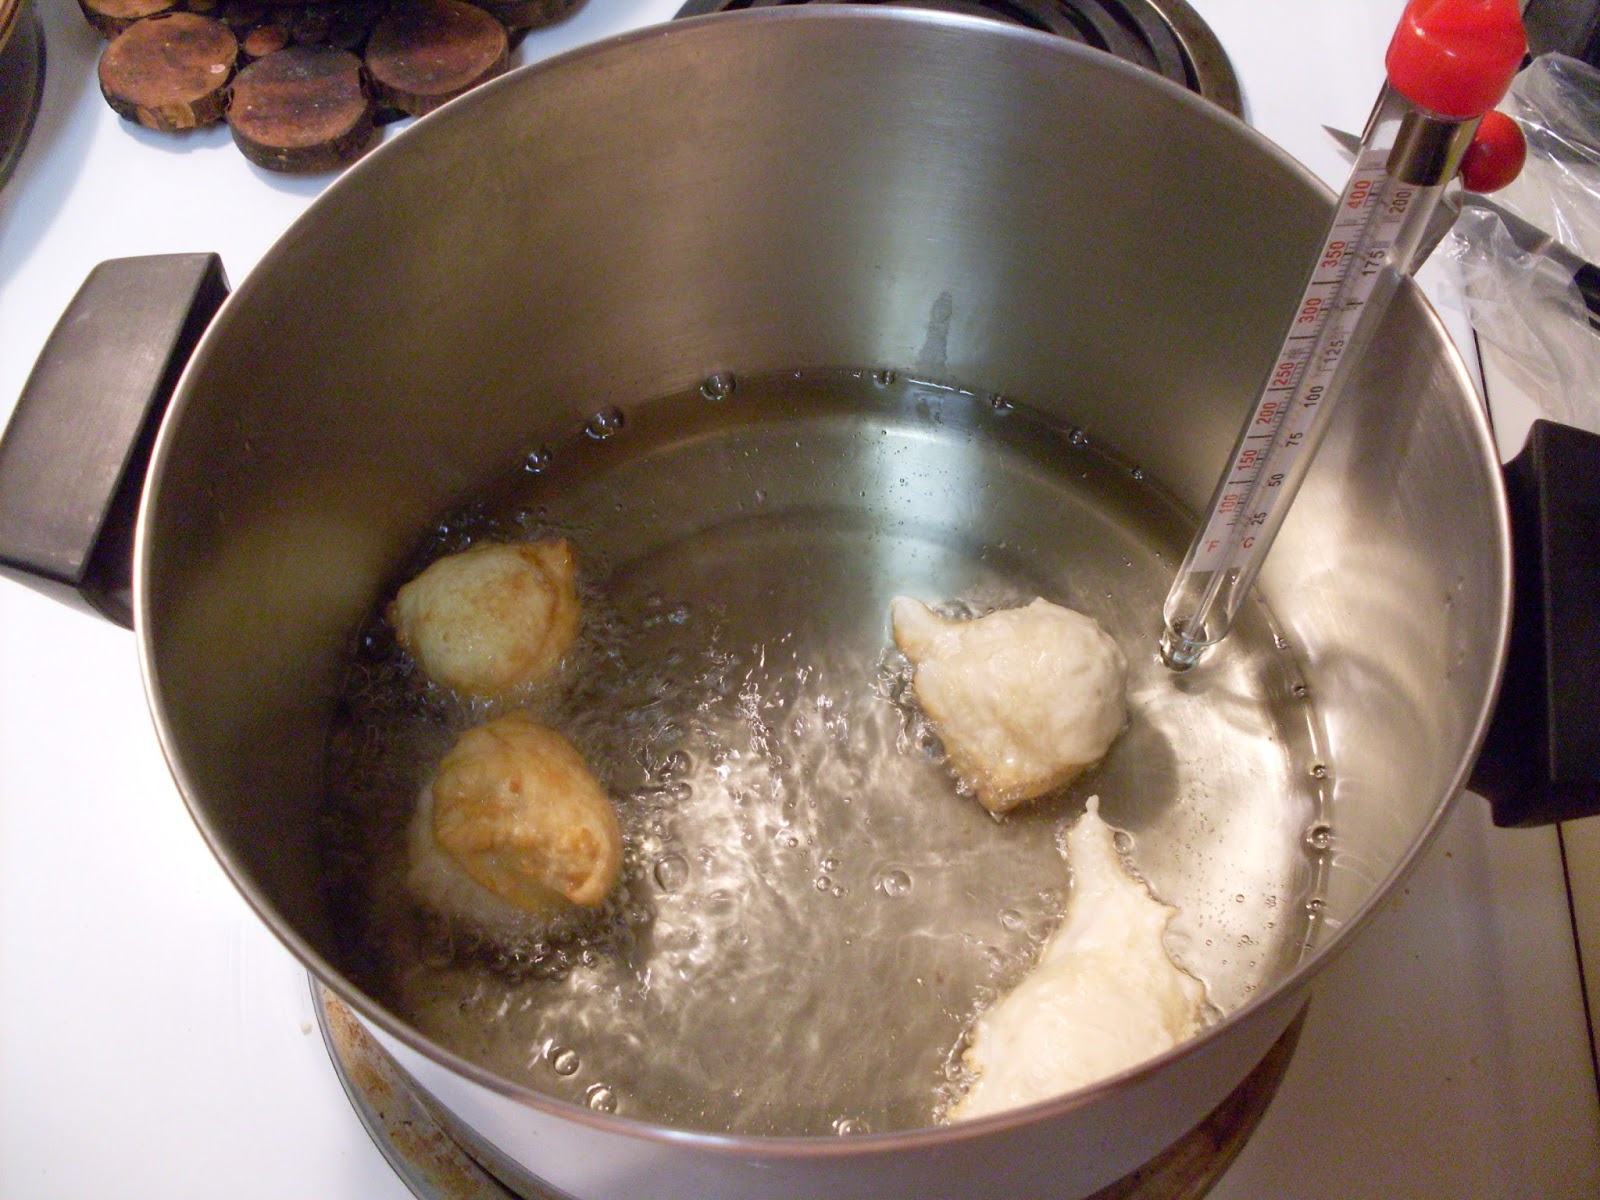
You can fry several buñuelos at one time as long as you do not crowd them in the pan. (I did four at a time.) As they fry, turn them several times until they puff up and become golden in color, about 8 minutes.
 7. Remove them with a slotted spoon and drain them on paper towels.


Serve the fritters:
8. Place the fritters on a plate. Drizzle the hot honey syrup over them and sprinkle them with cinnamon and powdered sugar.

Note: These are best when eaten fresh. In a pinch, or for a crowd, the fritters can be made ahead, and then dipped into the honey syrup just before serving.
Variation: Sephardic cooks would have used olive oil to fry the fritters. We suggest a mixture of 1 3/4 cups vegetable oil and 1/4 cup olive oil.(I used a blend of all the oil I had in the house. Olive oil is a really heavy oil and I didn't want to use too much of it for a dessert.)

In keeping with the story of the temple and the oil lasting for eight days when there was only enough for one day, I had my own Hanukkah miracle! I used up most of my oil to make these, and ended up having just enough to fry the entire amount of dough without having to make an emergency trip to the store to buy more!

So, these were like little pillows from Heaven. They taste like waffles! My apartment smells like a fish fry now! But it was worth it to taste these little nuggets of joy. I drizzled them in all the toppings and then stirred them around. You might need to use a spoon or a fork to do this because that honey is molten, but if you're more seasoned, you can use your fingers like I did. In the restaurant business, the term is "asbestos fingers" to describe when you can touch hot things and not burn yourself. It comes with time and practice and is not for the faint of heart!

Also, be careful with the honey, it's currently on everything, including my water bottle. It's sticky as heck! I have some of these to take to work tomorrow too. Hopefully they'll reheat decently for people to try them out.

Well, hopefully my family will get to try the rugelach in a couple weeks when I see them for Christmas! This was a fun set of recipes. I recommend them both very highly. For those of you who celebrate, I hope you have a most wonderful and joyous Hanukkah this year!


Saturday, November 12, 2016

Holiday Soiree: Guru Nanak Jayanti


The Holiday: Guru Nanak Jayanti(India)
This joyous holiday celebrates the birthday of Guru Nanak Jayanti, the first Guru, and creator of Sikhism. He was from what is now Pakistan. Sikhism is a monotheistic religion with it's roots in both Hinduism and Sufism, though it is entirely its own religion. It was created in the late 1400's.

Sikhs are known for being very peaceful people, yet oftentimes they are mistaken for terrorists by people who don't know any better. Because Sikhs wear head coverings, and many Muslims do as well, some people don't know the difference and also think all Muslims are terrorists, jump to the wrong conclusion. If you have any Sikhs in your life, make sure to wish them a happy celebration on Monday!

More information
More information2

The Food: Lassi and Badam Halwa
This holiday is actually known for a traditional food, Karah Prasad, a sweet made with semolina flour, but I completely forgot this in my researching for recipes and came up with the other two recipes instead.(This week has been rough, and my mind has been a bit distracted. It's sort of a miracle I managed anything all today, actually.) Oh well, maybe next year I'll remember! I made sure the recipes I did choose were sweet, because that is what this holiday is known for most. At least I got that right!

The first recipe is Lassi, or a beverage made from yogurt. I happened to have all the ingredients on hand, which is always nice! This is ridiculously easy to make. I will provide the link to the recipe here, but describe the process.
Combine all the ingredients in a bowl, and use a hand-held blender to combine it all. Be careful with the rose water, it is very strong. I didn't measure the sugar, but I think it ended up being about a tablespoon or so. When you blend it, taste it and adjust the sugar and rose water to taste. That's really all it took to make this. Probably three minutes tops!

The next recipe, the Badam Halwa, is a little more complicated and took a bit more time. Here is the recipe. Badam Halwa is an almond pudding that tastes a little like marzipan.
You start by soaking almonds in water for two hours. I stirred them around a couple times while they soaked.
After they've finished soaking, you drain the almonds and remove the skins. I placed them in a towel, rolled it up, and rubbed it on the outside, which is what you do to remove the skins on toasted nuts. Alas, this does not work on soaked nuts. I had to come up with a different way. That way ended up being, actually squeezing the skin off of each individual nut. It took about 20 minutes to do, but as you can see, it worked pretty well. I should note, that these were raw almonds, not toasted.
The almonds are placed in the food processor, with the milk, and ground up as finely as you possibly can get it. I needed a spatula to scrape down the sides several times before it was as fine as it would get. During this time, I was also melting the butter for the ghee, and making the simple syrup. Because I tend to not read recipe instructions well, I missed that you were supposed to put all the sugar in the water for the syrup, and only put 1/4 cup sugar into an equal part of water. I found this to be plenty sweet, so keep that in mind if you make this. You do not need the full amount of sugar the recipe calls for.
This is what it looks like after you mix the almonds into the simple syrup, add the saffron(which I didn't have, and used a pinch of turmeric instead. Turmeric is also known as "poor man's saffron," so I thought it would be an acceptable replacement.) I also added 2 drops of yellow food coloring.
This is the finished product for both items. You can see how frothy the lassi gets. Almost an inch of foam on the top. The flavor is very unique. The tang of yogurt, floral note of the rose water, sweetness of the sugar, and the inexplicable flavor of cardamom blend into something I can't really describe. It feels like a substantial drink that you could drink instead of a smoothie. I'm not sure I would drink this a lot, but it's worth trying once, at least.

The badam halwa is really sweet and almondy. It is very much like a soft marzipan. I found a little went a long way. I was sweeted out after a few bites. I'm not sure why mine didn't seem as gummy-looking as the picture in the recipe looks, but as I look over the recipe again, I see that I was supposed to do all the stirring and mixing over heat...I didn't do this...That probably explains why mine didn't get as tightened up as the recipe version. I really do need to actually read these instructions before I cook! It still turned out good, though.

I am not very familiar with Indian food, either eating or making, so this was a good way to introduce myself to it. I believe I have at least one more Indian holiday scheduled in this project, so there should be more chances for me to try it out in greater depth. Maybe try something in the savory realm too. I did research savory recipes, but didn't have an opportunity to track down some of the more hard-to-find ingredients.

Well, as I said, it's been a rough week for all of us, hasn't it? After the election, I wasn't sure if I would be able to do a blog post today, or if I should even continue this project. Did anything matter now? Wasn't a project like this too trite for the world we now live in? But after a day or so, I developed that old theatre adage: The show must go on. Our lives will go on, and in times like these, levity, joy, and celebrations are more important than ever. So, I will continue this project, to give myself and others a brief moment of enjoyment, and also to show that I am not going to let anybody have that power over me. Nobody gets to take away what I love to do and what make me happy. If I let somebody have that power over me, then they have won over me, and I will now allow that to happen. So, I hope to see you all next week, and I hope we all get out there and continue to look out for each other. Let's reconvene next weekend to relax for a moment, and enjoy the next holiday soiree.


Sunday, October 9, 2016

Holiday Soiree: Autumn Celebration

I'm back with a new project! I have been researching holidays around the world and have found a lot to share with you all! I don't have one for every week, so in those weeks, I will work on other food-related things that I haven't had time to work on. I hope to have a similar structure to my previous projects, where I talk about the history of the holiday and/or the food I am preparing. Next week, there is no holiday either, so I will be focusing on Halloween for a couple weeks, but generally, I will only spend one week per holiday. Some weeks might have a single dish, and some weeks might have an entire meal. It just depends on how much time I have to put into it.

Last night, I made two desserts. I had fun picking out the recipes from my seasonal recipe card box. The first recipe is titled "Pumpkin and Walnut Spoon Sweet". I thought it was a fun name, so I had to try it out. I wasn't sure what it was going to be exactly, but it's basically stewed pumpkin. The second recipe is "Best Apple Custard Tart" and it was a pretty complicated recipe that took two recipe cards to write out. I wanted a challenge, so I took it! Luckily, I won!

Pumpkin and Walnut Spoon Sweet
1/2 cup chopped walnuts
1 (2lb.) pumpkin, peeled and cubed
3/4 cup sugar (I cut this down to about 2 Tbsp. and found it to be perfectly sweet. The full amount of sugar would probably hurt your teeth!)
Zest of one lemon, cut in long strips
2 cinnamon sticks
6 whole cloves

1.) Preheat oven to 350 degrees. Spread nuts on baking sheet, and bake 5-7 minutes, or until toasted and fragrant. Cool. (If you are confident enough, you can toast them in a frying pan on the stove, but if that sounds too intimidating, just use the above method.)
2.) Combine remaining ingredients plus 2 cups water in a large saucepan.
Bring to a boil, reduce heat to medium-low, and cook 1 hour, or until pumpkin is tender. Raise heat to medium-high, and cook 10 minutes more, or until almost all liquid has evaporated. Remove from heat, and cool. Discard zest, cinnamon, and cloves, and serve sprinkled with toasted nuts.
6 servings 184 calories, 6 g fat, 1 g fiber

This smells so good! It really smells like Thanksgiving. I wasn't sure what stewed pumpkin would taste like. The flavor was actually pretty good, but the texture was odd to me. Maybe I'm just not big on squash, but I didn't care for the texture. A couple of tips when you are done cooking this: Remember how many strips of lemon zest you put in, because it will be difficult to find them again. The color is nearly the same as the pumpkin and the zest bunches up and doesn't stay in long strips. You do not want to accidentally bite into one of those! Also, the cloves seem to come apart a bit, so make sure to dig through and pull out all the different bits you find before eating. Again, you don't want a big bite of a whole clove either!

I'm not sure I would make this one again. If you like the texture of pumpkin, then this is a great recipe showcasing it. The smell is amazing. You can't help but be happy. But other than that, I think I'll just eat my pumpkin in pie form...

Best Apple Custard Tart
Crust:
1 cup flour
1/2 cup cold butter, cut into 1" pieces
2 Tbsp. sugar
1 egg white
1 tsp. lemon zest
Filling:
3 med. Pink Lady or Fuji apples (I used honeycrisps because that's what I had on hand.)
1 cup apple cider (I used apple juice)
2 Tbsp. lemon juice or apple cider vinegar (I used lemon juice)
1 egg plus 1 egg yolk
1/2 cup sugar (I used the full amount. Because this is for the custard, you can't really mess with this.)
1/4 cup cornstarch
2 Tbsp. butter

1.) Preheat oven to 375 degrees and line the bottom of a two-piece, 10" springform pan with a circle of parchment or spray it with cooking spray.
2.)Make pastry: Put the flour, sugar, and salt in a mixing bowl, stir with a fork. Cut in the butter with two forks or a pastry cutter until the pieces resemble peas. Add the egg white and the lemon zest and mix until it just comes together. (It will seem really dry at this point. Resist the urge to add water.) Gently knead in the bowl for about a minute, just until the dough comes together and holds it's shape.
3.) On a floured surface, roll the pastry dough into a 10"circle and put in the springform pan. (This dough is actually really wet and crumbly. I found it incredibly hard to work with. I suppose I could have tried adding more flour to it, but I didn't think of that at the time. If yours is wet too, I would recommend rolling it on wax paper and using that to transport it. Mine fell apart and I basically pieced it back together in the pan. This was really hard and frustrating to do, especially for the sides.)
Line the pastry with parchment or foil and fill it with rice or beans. Bake the pastry until the edges are lightly browned, about 20 minutes. Remove the parchment with the rice or beans and bake until the center of the crust is dry and just beginning to turn golden, about 5 minutes more.
4.) While the crust is baking and cooling, poach the apples and make the filling. Start by poaching the apples. Peel and core the apples and cut each of them into 1/8ths. If some of them are very big, cut them into uniform pieces to match the smaller ones. Put them in a large saucepan on the stove and pour over the apple cider and lemon juice. Cook over medium-high heat until the cider is boiling, then reduce heat to low and simmer just until apples are tender, about 10 minutes. With a slotted spoon, transfer the apples to a large plate and allow them to cool while making the custard with the poaching liquid.
5.)To make the custard, whisk together the egg, egg yolk, the sugar, and the cornstarch in a medium-sized mixing bowl.
Whisk in about half of the simmering cider(this is called tempering and you do it to keep the eggs from curdling when you add it to the hot liquid on the stove), then transfer the tempered egg mixture to the pan and cook, stirring constantly, until the mixture is boiling vigorously. (You will want a large whisk for this. It will get really frothy for a while and look like it's not doing anything. Be patient. Then all of a sudden, it will start to get chunky and you will be worried that you did curdle the eggs after all. This is when you'll want to whisk it as vigorously as you possibly can and remove it from the heat. What is actually happening is the cornstarch blooming all at once. It's kind of scary if you don't know it's supposed to happen, but don't panic. In the end, it will resemble the custard filling in a doughnut.)
Transfer the cooked custard back to the mixing bowl, whisk in the butter, and let it cool for 15 minutes or so. (I was so freaked out from how the custard sort of exploded into custard at the last minute and realizing I hadn't ruined it, that I forgot to add the butter. I have no idea what it would be like with the butter, but I'm sure it would be lovely!)
6.) When the tart shell has cooled completely, fill it with the apple custard and arrange the poached apple slices over the surface.
(I found the color to be a bit monochromatic, so I sprinkled cinnamon on top just for some contrast.)
Serve it at room temperature or chilled
The tart is really sweet, but it's mostly the fruit that makes it sweet. It's very apple-y too. I loved the tart crust. It's lovely with the lemon zest and I have never heard of making it with the egg white like that, but it worked really well. I think I might have cooked the apples a few minutes longer if I had to do it over again, because some of them were a little crisper than I wanted them to be.

This one is complex. I won't lie. It's intimidating and I am probably a moderate when it comes to baking, not a beginner. If you want a challenge, this is a great one to try out. It's really tasty!

If you try out either of these, let me know. I'd love to hear how they turned out for you!
Ok, that's it for me this week, we'll see what I come up with for next week. Until then!
-Summer


Sunday, November 1, 2015

Dining-In: A Culinary Tour of America-Hallowell, Maine

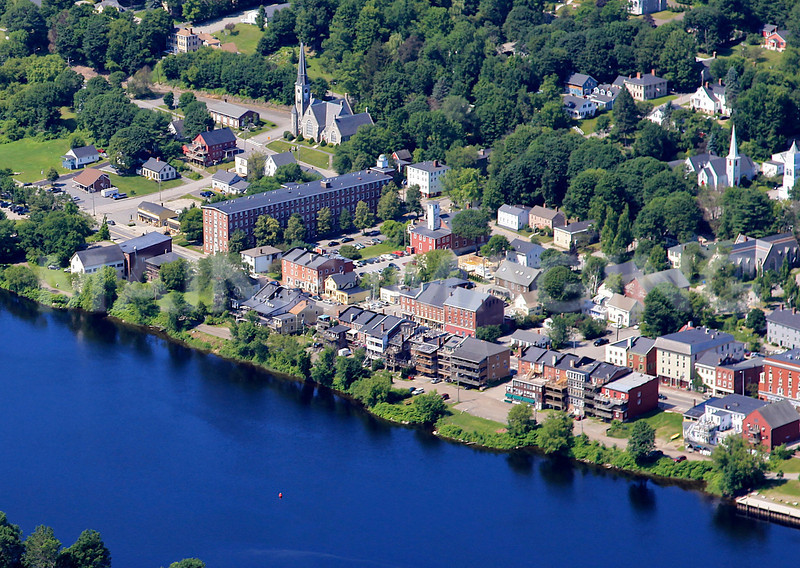
The Location: Hallowell, Maine
2013 population: 2,343 people; 94.6% white, 1.6% two or more races. Per capita income: $35,148.

Prior to the European invasion, the land around Hallowell was home to the Penobscot, or Panawahpskek, tribe. Hallowell was named for Benjamin Hallowell, a merchant from Boston. It was originally part of the city of Augusta, but it became its own town when Augusta broke off from it in 1797. The entire area was a part of the state of Massachusetts to begin with, but in 1820, Maine seceded from Massachusetts, and became its own state.

From 1815 to 1908, granite was the major industry for Hallowell. Ice was also a large part of their economy. Today, though, the city is known for its antique shops and pubs. For the most part, Hallowell has been a town relatively untouched by the major events of American history, though they did send many men to fight for the Union during the Civil War. The city today leans more liberal, in terms of politics, as it did then. Many people joined the war in order to help abolish slavery.

Why Hallowell? Because it's Halloween, of course! What a perfectly named city for this holiday!

The Food: A Duo of Desserts
I haven't done an all dessert post since Washington state's trio of apple desserts. Maine has a lot of seafood dishes it's known for, but as with last week with Maryland, there are so many kinds of seafood I don't eat that it wasn't very practical for me to feature them. This meant I had to get a bit more creative. With the fact that I would be doing this on Halloween, I decided to go in the dessert direction. Maine is also known for blueberries, and I opted for a recipe that heavily featured blueberries in their honor. Further research revealed a dish I have heard of, but never tried. I knew this was the time to try it!

First up is a recipe I found in my own collection. It comes from the Taste of Home magazine, unknown date.
Blueberry Oat Cake
2 eggs
2 cups buttermilk
1 cup packed brown sugar(I used 1/2 cup brown sugar and 1/2 cup unsweetened applesauce and I think it turned out just fine)
1/2 cup vegetable oil
2 cups flour
2 tsp. baking powder
1 tsp. baking soda
1 tsp. cinnamon
1/2 tsp. salt
2 cups quick-cooking oats
2 cups fresh or frozen blueberries, unthawed
1 cup chopped walnuts(I used pecans because they are naturally sweeter in taste than walnuts), optional
Powdered sugar

In a mixing bowl, beat the eggs, buttermilk, brown sugar(and applesauce, if using) and egg. Combine the flour, baking powder, baking soda, cinnamon and salt; add to batter. Beat on low speed for 2 minutes(or by hand, which is what I did). Fold in oats, blueberries and walnuts(or pecans), if desired.
Transfer to a greased and floured 10" fluted tube pan(Bundt cake pan). Bake at 375 degrees for 45-50 minutes or until a toothpick comes out clean.(Note, this cake is way too thick for a toothpick to do any good. I used a bamboo skewer since it was long enough to get to the bottom.) Cool for 10 minutes before removing from pan to a wire rack to cool completely. Dust with powdered sugar.
Makes 12-16 servings
This is what happens when you didn't see the part about flouring the cake pan until you just typed up this recipe 30 seconds ago, and try to remove it while it's still too hot. This was a literal hot mess, but it tasted good. I was able to dislodge the top half of the cake and sort of put it back together, but unfortunately it definitely crumbled when I cut pieces from it. Again, the flavor was fantastic and I'm sure if I'd floured the pan and had let it cool longer than the 10 minutes it called for, it would have done better. I have used my Bundt pan many times and have rarely had this bad of an issue.

Next up, a New England staple called Indian Pudding. I don't know about you, but I am not necessarily comfortable eating a dish with the word "Indian" in it, when it isn't actually Indian food. This dish has an interesting history. In England, it is made with wheat and is known as Hasty Pudding. You may have heard of this. It's pretty well-known, and even has its own club. When people started traveling to the New World, they discovered new ingredients, such as corn, that when dried and ground, was a grain that could be used in a variety of ways. The Europeans referred to it as "Indian meal," and from there comes the name of this dish.

I would argue that Indian Pudding is one of the first, if not the first Americanized recipe. Or to be even more historically-accurate, the first New Englandized recipe. America, of course, wouldn't be in existence for a little while longer. Taking a well-known recipe from England and substituting ingredients available in the New World, though in a very simple and humble dish, was the beginning of what would become American food culture.

If I was to rename this dish, I would propose calling it "Yankee Pudding," because it refers to the region in which it was invented, and acknowledges its American-ness. Though we were introduced to corn from the Native Americans, they never ate it in this form.

The recipe I used is from the internet, but I will type it out here, along with any changes or notes of my own.

Maine Indian Pudding
2 cups milk
1/4 cup cornmeal
1/2 cup milk, cold(Note, the website lists this as 1/4 cup, but the instructions say 1/2 cup. I used 1/2 cup, so I changed the quantity in this section to match because it was confusing otherwise.)
1/2 cup dark molasses, not blackstrap(I am not the biggest fan of molasses. I cut this down to 1/4 cup and did 1/4 cup of raisins to give it additional sweetness. I still found it to be overwhelmingly sweet and if I was to do this again, I would probably have cut it down to 1/8 cup, which is 2 Tablespoons of molasses and the rest raisins. With molasses, a little really does go a long way.)
1 tsp. salt(Because I did cut down on the amount of molasses, the salt came through a bit more than it should have. If you reduce the quantity of molasses, I would cut the amount of salt in half.)
1/4 cup sugar
1 tsp. cinnamon
4 Tbsp. butter
1 3/4 cups milk, cold

*Scald 2 cups of milk in a double boiler.
*Mix the cornmeal and 1/2 cup cold milk until smooth. Stir into the hot milk and cook over the hot water for 20 minutes, stirring frequently.(When you do this, you will be wondering what, if anything, is happening with your mixture. The milk will get frothy as you stir it but not much will change until about the last 5 minutes when it starts to thicken. Just keep faith in what you're doing and know that it will turn out ok in the end.)
*Add the molasses, salt, sugar, cinnamon, and butter; mix well.
*Pour into a buttered dish.
Pour the last 1 3/4 cups cold milk over the top of the pudding.
*Bake at 250 degrees for three hours(I started this about 4.5 hours before I wanted to serve it. The dish is based on something called Hasty Pudding, which is ironic, because it takes hours to prepare. Go figure!) Remove from oven and let sit for 30 minutes. Serve with ice cream or whipped cream, if desired.
Makes 4-6 servings.


As you can see, the cake was better-looking once I dug the top half out of the pan. It's just a facade though, it's definitely a chunky cake. The pudding is really interesting. The milk poured on the top sort of soaks into the pudding and also evaporates and creates a skin. Normally I don't like skin on pudding, but this was different. Because of the sugar and molasses, it was almost like the top of a burnt creme where you have to break through the caramelized sugar topping. It provided the majority of the texture. The rest of the pudding is very soft, but that gave you something to bite into and chew. The raisins also were really good in this. And not only is this something that doesn't call for a lot of cornmeal, which means your cornmeal goes a long way, it's also properly gluten free! So, all you gluten free eaters can partake of this and not worry about it! I cannot vouch for using an alternate non-dairy milk. It may or may not turn out the same. Try that out at your own risk, but do let me know if it works for you!


I really liked both of these desserts. Even though the pudding was a bit too molasses-ey for my tastes, it was still tasty. It was cool to use cornmeal in a completely different way too. I have used cornmeal a lot in this project. It's a New World ingredient after all, so it should feature highly in a project about American cuisine. For some reason, the pudding evoked images of the past. You can feel the history in it. The cake was delicious as well, but a much more straight-forward dessert. Both of these also make a lot. These would be good for groups. I had enough for tasting tonight, and to try tomorrow, and still had enough to share with my parents, my grandparents, and still have enough of the blueberry cake to take to work on Monday to share with my coworkers! You should definitely give these recipes a try!

Sources:
City Info

City Pic

City Map

Indian Pudding Recipe

Indian Pudding History

City History


Sunday, May 31, 2015

Dining-In: A Culinary Tour of America-Quincy, Washington


The Place: Quincy, Washington

Do you know how hard it was to find a place in my own state that I have not been to? I knew my rule of "It has to be a place I've never been to before" would be hardest here in Washington. I managed it, though! Once I decided to focus on produce instead of salmon, it narrowed it down to the eastern half of the state, which definitely opened up a few more options for me. I've been to the bigger cities east of the mountains, so it was still challenging to find a small town with enough to talk about that I had never been to. And so, I present to you, Quincy!


As of the 2010 census, there are 6,750 people living here. Because the information was messed up in Wikipedia, the following information is based on the 2000 census. 75.1% of the population is white, and 12.5% is Hispanic or Latino. The per capita income is $12,649 and 20.9% live below the poverty line. This may no longer be the case, however, because as of the mid 2000's, Quincy has become the home to data centers for several major companies, including Microsoft and Yahoo!. This is because the city's location by the Columbia River makes it ideal for the use of hydropower, and also because the region is relatively natural disaster-free. The city has seen an increase in tech companies, but still relies heavily on agriculture for its economic base. The city's website has the slogan "Where Agriculture Meets Technology!" which is a very accurate saying. In addition to technology, Quincy is a large producer of cherries, wheat, apples, and potatoes for the state of Washington.

Quincy was established in 1892 as a railroad camp during the construction of the Great Northern Railroad. It was incorporated on March 27, 1907. It wouldn't be until the early 1950's however, when the Grand Coulee Dam brought water to the area in great quantities, that agriculture would become the city's main claim to fame.

Quincy is also near several tourist areas and benefits from being the closest full-service city with amenities for visitors. It is located close to the Gorge Amphitheatre near the city of George, and also near Crescent Bar, a town by the river that gets a lot of tourists during the summer because of their water-based attractions. For those of you who may never have traveled east of the Cascade mountains, the eastern half of the state is very hot and dry. Some parts are nearly desert-level, so having water is a very good thing for tourism.

The Food: A trio of apple desserts


When I picked apples, it didn't take long for me to decide on desserts over savory. I thought it would be a fun change of pace. My first pick was a classic Apple Brown Betty, which I had heard of but never tried before. And I usually make two items, but when I saw the one puff pastry recipe, and saw another one in my recipe collection, I decided to try them both. Why? Because when you buy puff pastry at the store, it comes in a two pack, so why not use it all up at once? The recipes were similar but also very different, as the picture shows. I found all these recipes in my own personal recipe card collection, and I no longer know the sources. And as always with desserts, I changed it to cut out a lot of the sugar. I will write them out as I made them because I don't think the recipes suffered at all, really. In fact, there was less waste. Some of the steps in a couple of the recipes asked for you to drain off the syrup created by the sugar and liquid given off by the apples, and just throw it away! By using less sugar, it didn't create excess liquid to be thrown out. This kept all the flavor, in a more concentrated form, in the dish, which means I didn't need to sweeten it more. My parents actually drove up last night at 9pm to get some of it. They said it was delish, so, it must be good and not just me being biased! But it was all pretty darn good, I think! Also, I didn't take pictures of the assembly of the food because it really wasn't note-worthy, so the picture of the final products, is the best of the best I took last night. I like that even though the puff pastry desserts are largely the same ingredients, they look very different, visually. I think it all turned out to be very pretty food. And also, the leftover pastries make a lovely breakfast the next day...Just eat them at room temperature and the pastry is still good the next day! I know this because I am writing in between bites...

Apple Brown Betty: I made a half batch, but this can easily be doubled.
4 slices firm white bread, torn into 1/2" pieces
1/4 cup butter, melted
1/2 tsp. ground cinnamon, divided
1 1/4lb. Granny Smith apples, peeled, cored, and thinly sliced
1/3 cup unsweetened apple sauce, minus 1 Tbsp.
1 Tbsp. brown sugar (I put the sugar in the bottom of the 1/3 cup and topped it with the applesauce. The original recipe calls for 1/3 cup brown sugar for the amount I made, but there was no way I was going to use that much sugar. This was a good compromise. The applesauce added moisture and sweetness but without as much sugar. The small amount of brown sugar added enough of the flavor but didn't add too much excess sugar, either.)
1 Tbsp. lemon juice
1/2 tsp. vanilla
1/8 tsp. ground nutmeg

1.) Preheat oven to 400 degrees. On a baking sheet, bake the bread pieces until very lightly toasted, about 12-15 minutes, stirring occasionally. Grease a shallow 2-quart ceramic or glass baking dish.(I used my 9"x9" Pyrex dish.)
2.) In medium bowl, combine melted butter, and 1/4 tsp. cinnamon. Add toasted bread; toss gently until evenly moistened.
3.) In large bowl, toss sliced apples, brown sugar and applesauce, lemon juice, vanilla, nutmeg, and remaining 1/4 tsp. cinnamon.
4.) Place 1/2 cup bread pieces in the baking dish. Top with half the apple mixture, then 1 cup bread pieces. Place remaining apple mixture on top; sprinkle with remaining bread pieces, leaving a 1" border of apples all around the edge.
5.) Cover dish with foil and bake 30 minutes. Uncover and bake 10 minutes longer or until apples are tender and crumbs on top are brown. Let stand 10 minutes before serving. Serve warm.
Makes 4 servings

Most Apple Brown Betty recipes call for breadcrumbs, so if you wanted to take the bread after it's been toasted and crush it into crumbs, feel free to do so. This was quite tasty. I mean, it's basically cinnamon bread and apples, but it's a good, simple, easy dessert that's also a good way to use up bread that might be getting too old and tough for sandwiches. This would be good with whipped cream or ice cream, if you eat that sort of thing.

Sauteed Apples in Puff Pastry:
2 Tbsp. butter
1 Tbsp. brown sugar(original recipe calls for 1/3 cup)
1 Tbsp. bourbon
1 tsp. ground cinnamon
1/8 tsp. ground nutmeg
3 medium cooking apples, peeled, cored, and chopped(I feel this actually made too much filling and when I tried to cram more into the pastry to not feel like I was wasting it, it made it difficult to fold and properly close. I still managed it, though. I think 2 apples is more than enough. I used Pink Lady apples for this and they were perfect.)
1/2 of (17 1/4oz.)pkg. frozen puff pastry, thawed(1 sheet) (I used Aussie Bakery brand instead of Pepperidge Farms. If you can find this, I highly recommend it. It's more expensive, but the flavor and texture are well worth the cost. The other brand is ok and will do in a pinch, but the flavor and texture is inferior, in my opinion.)

In a large skillet, melt butter. Stir in sugar, bourbon, cinnamon, and nutmeg. Add apples; cook and stir over medium heat until tender, about 6 minutes.

On a lightly floured surface, roll pastry to a 12" square. Cut into nine (4") squares. Place about 2 Tbsp. apple in center of each square. Brush edges lightly with water. Bring one corner of pastry over apples to opposite corner. Seal around edges with a fork.(You are making a turnover, basically.) Prick tops to release steam. Repeat with remaining squares. Place on an ungreased baking sheet and bake in a 400 degree oven about 20 minutes or until golden. Cool slightly on a wire rack. Dust with powdered sugar(I didn't do this, but you can if you want!)
Makes 9.

If you cut the amount of apples down to two instead of three, you might need to alter the amount of butter you saute it in. You might not need as much. Same goes for the seasonings and sweetener, just do it all to taste. This was sooo good!

Brown Sugar Apple Pastries:
1 sheet frozen puff pastry, thawed
4 Tbsp. butter, divided(you want the butter to be very soft, but not melted, for this recipe)
1 1/2 Tbsp. brown sugar, divided(original recipe calls for 3/4 cup!)
3 Tbsp. unsweetened apple sauce
1 1/4 tsp. ground cinnamon, divided
2 Granny Smith apples, peeled, quartered, cored. Cut each quarter into three slices(The original recipe calls for 3 apples, but this would be way too much to fit on the pastry, as you can see in the picture.)
1 Tbsp. lemon zest (I actually forgot to get this so I just put some lemon juice in the mixture instead and it was fine.)

Position rack in bottom third of oven and preheat to 425 degrees. Unfold pastry sheet on work surface. Cut into three strips along fold lines. Cut in half crosswise. Transfer rectangles to one ungreased baking sheet.

Blend 2 Tbsp. butter, 1 Tbsp. brown sugar, and 1/4 tsp. cinnamon in a small bowl; spread over rectangles. Bake ten minutes. Pierce crusts with a fork to deflate.(The recipe says to keep baking after this for six more minutes or until the bottoms are golden. Mine were perfect after the ten minutes and didn't need more taking time. Check yours at this time to see if you need to bake it more or not. The sugar topping is definitely not something you want to overbake...)

Meanwhile, melt remaining 2 Tbsp. butter in a large skillet over medium-high heat. Add apples. Saute until beginning to brown, about 8 minutes. Sprinkle with the remaining 1/2 Tbsp. sugar(for those who might not know, 1/2 Tbsp. is the same as 1 and 1/2tsps.), the applesauce, cinnamon, and lemon zest or juice. Toss until the apples are softened but still hold their shape, about 5 minutes.

Transfer crusts to platter. Top each with apples; drizzle with any syrup from skillet. Serve warm or at room temperature.
Makes 6

I was really impressed with the visual presentation of this one. It's so simple, but so cool too. Also very delicious. All three of these turned out just perfect with the alterations I made, which just goes to show you, that you can cut out a lot of sugar from most desserts, without suffering from changing the taste or texture. Test it out for yourself sometime and you'll see what I mean. Baking in particular, is a science and best done with precise measurements, but I am learning more and more as I try this out, that you do have some room to change things around before you change the taste/texture beyond what it's supposed to be. If you try it out sometime, you'll have to let me know how it worked for you!

All these recipes made me really proud, and happy, that I live in Washington state and have access to so many different varieties of apples. They really are quite a tasty fruit!

Sources:

Official Quincy City Website

City map

City Pic

Sunday, April 26, 2015

Dining-In: A Culinary Tour of America-De Smet, South Dakota


The Location: De Smet, South Dakota


The picture isn't much to look at, I'll admit, but I picked this town for a reason. A very good one, to me, at least. This town is on my "bucket list" of places to see. If you don't know off the top of your head why, I'll explain...

As of the 2010 census, the population of De Smet was 1,089 people. 98.8% of them are white, and 0.6% are Native American. The unemployment rate is 1.1%, with an average income of $26,042.

Dakota was made a territory in 1868. It is the subject of a song featured in the 1960's Disney movie, The One and Only Original Family Band. If you haven't seen this movie before, you should. It's fun. Watch it around Election Day...


This song was actually in the running to be named the official state song for South Dakota. It's quite lovely, I think. 

De Smet was "platted", the step prior to incorporation, in 1880. It was named after Father Pierre De Smet, a Jesuit missionary who worked with Native Americans during his career. The first train came through the town in 1880.

You're probably saying to yourself, wow, there's really not much to this town, why ever did you choose it? Well...now we come to the reason I chose it. Those of you familiar with the works may already know the name, but in case you are not, I will tell you. De Smet was the home of Laura Ingalls Wilder. She came with her family in 1879 at the age of 12 and would end up living there for the rest of her life. Three of her books: The Long Winter, Little Town on the Prairie, and These Happy Golden Years, all take place in De Smet. And a fourth book, By the Shores of Silver Lake, takes place nearby. Laura met and married her husband Almanzo Wilder there, and her daughter, Rose Wilder Lane, a famous writer and journalist in her own right, was born and raised there. The town has many tourist attractions you can visit, including the farms and houses they lived in. I have always wanted to visit this town because I am a life-long fan of the Little House books, and the tv show. Some day I will visit here.

The Food: Sour Cream Peach Kuchen

Kuchen is the official state food of South Dakota, and for good reason. It's quite fantastic. It's also because there are a lot of German immigrants to the state and this is a German dessert. One of the best gifts immigrants to our country bring to us, is their food. That is one thing I am learning more and more with each week of this project. Some people might feel threatened by immigrants, but I think we can all agree that we all eat better by having them here.

This dish is dedicated to my co-worker Tanya, who recommended I look into it. I'm glad I did because it is amazing! It turns out I have several recipes in my collection, but I've never made any of them before. They all had ingredients that were out of season, but one of them had an economical alternative, so I chose that one. Peaches are not in season yet, and frozen cost so much money for the amount I needed that I turned to canned peaches. Yes, I used peaches from a can, and I lived to tell the tale. I try to avoid corn syrup as much as possible, so the idea of using peaches that are soaking in it was gross to me, but I rinsed them off very carefully and I think it kept the corn syrup to a minimum. The recipe is from the Taste of Home magazine, February/March 2001 edition. I will write it out as it was originally written, but add my own changes to it in parenthesis.

Sour Cream Peach Kuchen

Ingredients:

3 cups flour
1 1/4 cups sugar, divided (I used 1/4 cup sugar and 1 cup of unsweetened applesauce instead)
1/2 tsp. baking powder
1/4 tsp. salt
1 cup cold butter
2 cans (29 oz. each) sliced peaches, drained or 13 small fresh peaches, peeled and sliced
1 tsp. cinnamon
Topping:
4 egg yolks
2 cups (16oz) sour cream
2-3 Tbsp. sugar (I used 1 Tbsp.)
1/4 tsp. cinnamon

In a bowl, combine the flour, 1/4 cup sugar, baking powder and salt; cut in butter until mixture resembles coarse crumbs. Press into the bottom and one inch up the sides of a greased 13"x9"x2" baking dish.


Arrange peaches over crust. Combine cinnamon and remaining sugar(This is where I used the applesauce); sprinkle over peaches. (I mixed them in a bowl with the applesauce and cinnamon to make sure it was all very well combined and then poured them over the crust.) Bake at 400 degrees for 15 minutes.


Meanwhile, in a bowl, combine egg yolks and sour cream. Spread evenly over the peaches. Combine sugar and cinnamon; sprinkle over the top.


Bake 30-35 minutes longer or until golden. Serve warm or cold. Store leftovers in the refrigerator. Yield: 12 servings


This was good warm last night but it was even better this morning cold. The crust is basically a shortbread. When you make it you will think you're doing something wrong because you're adding no liquid to it. But this isn't a pastry, so resist that instinct to add liquid and stick to the recipe. The peaches will add some moisture to it and the butter will melt into it to hold it all together. The sour cream/egg yolk topping is new to me but quite a revelation. It has a cheesecake quality to it but without using cream cheese. This is a wonderful surprise to somebody who is lactose intolerant. I can eat certain brands of sour cream without issue, but cream cheese I can only eat one particular brand that is very expensive, which means that cheesecake is no longer possible for me. This was a very fun treat.

This was the first time I have made something that turned out exactly as the picture looked. I was excited to see that it was just like it should be. I have at least two other kuchen recipes and I might have to try them out this summer when stone fruits are in season.

I would say this recipe was pretty easy to make. Somebody who doesn't have a lot of baking experience will be able to make it without much trouble. I would recommend everybody try this sometime. You won't regret it! The most dangerous part of it all, though, is that I am off work this week so I have nobody to eat all the leftovers except myself...And let's be honest, I'm probably going to eat it all!

Sources:

Map

City Pic

Economic Info

City Info

Kuchen Info


Sunday, December 7, 2014

No Sugar Apple Pie

In my continuing endeavors to make desserts without added sugar, or fake sugar, I have invented a new delicious version of apple pie. I had one honeycrisp apple that was sitting around getting old, so I peeled and cored it and diced it up into small cubes. Put half the apple in a small frying pan with water and bring it to a boil. Let the apple get really soft and then use a fork to mash it up. Add the rest of the apple, and a dash of cinnamon, ginger, and cloves to taste. Cook this until the whole apple cubes are soft, but don't mash them.

While this is happening, take some of the store-bought frozen puff pastry cups and bake them up according to the package directions. When they're done, cut off the tops, spoon in the filling, mine made three perfectly, and top with the top piece of the cup to serve. This was perfectly sweet and spiced and the pastries are crispy and crunchy. It hits all those flavor and texture elements you want from a baked good. I would imagine you could do this with regular puff pastry and turn it into a turnover. Or you could use phyllo dough or pie dough, I'm sure it's all great. You could probably even attempt this filling for an actual regular-sized pie, but I can't vouch for it. If you do try this for a whole pie, I would recommend skipping the cooking of the whole apple cubes and just let it cook in the oven while the crust bakes.

This was super easy and super delish. I highly recommend it!

Tuesday, May 15, 2012

Cooking Light Weekend

I did two recipes this weekend and they both turned out great. The first was Peanut Butter Cup Blondies and this turned out to be amazing. I have always had good luck with the baking recipes I do from this magazine. This one didn't disappoint. It was simple and quick and very worth the time. I'd definitely do it again.


The next recipe was Chicken with Pepperoni-Marinara Sauce and I was very excited to try this one. Most pepperoni is made with a mixture of pork and beef, unless you use the turkey kind, which I don't care for. Since I don't eat red meat it has left pepperoni out of my diet for about three years now and I sure missed it. Until I discovered Applegate Farms pepperoni which is all pork. This stuff is soooo good. Since the recipe doesn't specify what size of pepperoni slices to use and I only had about 6 slices of mine, but it was the larger size, I just used the rest of that and called it all good. I think it had plenty of pepperoni deliciousness too. Make sure you use a really big pan to cook the chicken. I didn't and ended up having to do it in two shifts. This made a fun play on spaghetti sauce that I'd definitely make again as well.