Sunday, October 29, 2023

Cranberry Muffins

My place now smells like lovely cranberry orange almond muffins, thanks to the recipe I tried this afternoon. Since I can't track down the source, I'll write it out. I think they turned out to be really delicious! 

Cranberry Muffins

1 cup whole-wheat pastry flour(if you can't find this, like I couldn't, use 1/2 cup whole wheat flour and 1/2 regular flour)
1 cup flour
1 1/2 tsp. baking power
1/2 tsp. baking soda
1/4 tsp. salt
2 Tbsp butter, softened
2 Tbsp. canola oil
2/3 cup sugar
1 egg, lightly beaten
1 tsp. vanilla
3/4 cup orange juice
1 tsp. orange zest(I forgot to write this ingredient on my recipe card so I'm assuming it was orange zest and assuming this is a good amount. Just add whatever you want, there's no rules for zest!)
1 1/2 cups fresh or frozen cranberries, whole
3/4 cup sliced almonds, divided

1.) Preheat oven to 400 degrees for muffins, or 350 degrees for mini loaves or a loaf pan. Coat pan of choice or line muffin tin if doing muffins.
2.) Whisk together whole-wheat flour, flour, baking powder, baking soda, and salt in bowl. Beat butter, oil. and sugar in a large mixing bowl with electric mixer until creamy and pale. Add egg, zest, and vanilla, and beat until smooth. Alternately fold in flour mixture and orange juice, making 3 additions of flour mixture and two additions of orange juice. Stir in cranberries and 1/2 cup almonds.
3.) Scoop batter into prepared pans. Smooth tops and sprinkle with remaining almonds. Bake muffins 18-22 minutes, large loaf 50-60 minutes, or mini loaves 35-45 minutes, or until golden brown and tests clean when you test it with a toothpick. Cool 5 minutes. Loosen edges, and turn out onto wire rack to cool completely.

Makes 12 muffins, 1 loaf, 3 mini loaves. Per muffin: 173 calories, 5 g fat, 2 g fiber

Here we have the dry ingredients mixed together. Good luck tracking down whole wheat pastry flour. I went to three grocery stores and ended up googling substitutes, which I included in the ingredient list.
The wet ingredients ready to mix. I actually didn't have quite enough orange juice so I just used water to make up the difference. It's still plenty flavorful. I also didn't know I needed the zest until it was too late for the orange so I just threw in some dry lemon peel I had, and I think it worked just fine.
The finished batter looks really amazing! It's pretty thick but it made 12 perfect muffins.
Ready for the oven. Pre-almonds on top.
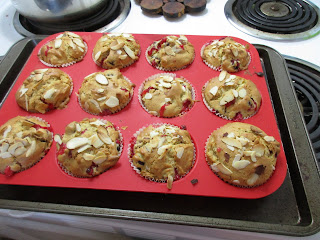
Just out of the oven. The almonds toast on the top so you don't need to toast them ahead of time.
And the finished product. Pre-butter, of course! These were really good. The almond and cranberry come through really strongly and you'd never know there was no almond extract in the recipe! The texture is really god. I was very happy with these! Especially with the butter!

Muffins are generally a really easy type of recipe to make. They don't take too many steps and don't dirty too many dishes. This time of year we can finally get fresh cranberries. This is a great way to use some!

Sunday, October 8, 2023

The 12 Weeks of Christmas Baking-Week 1

Yes, it's October and I'm starting the Christmas baking project in order for it to be done by Christmas! I started off easy, and luckily it turned out well! The recipe says it's from tasteofhome.com but I could not find it there or anywhere online so I'll go ahead and write it out.

Sweet Potato Biscuits

2 cups self-rising flour*

1/8 tsp. salt

1/2 cup shortening

1 cup mashed sweet potatoes

4-5 Tbsp. milk

In a bowl, combine flour and salt. Cut in shortening and sweet potatoes until mixture resembles coarse crumbs. Stir in enough milk, just until dough clings together. Knead lightly on a floured surface. Roll dough to a 1/2" thickness. Cut with a 2" biscuit cutter and place on lightly greased baking sheets. Bake at 450 degrees for 12 minutes or until golden brown.

Makes: 1 1/2 dozen

*As a substitute for each cup of self-rising flour, place 1 1/2 tsp. baking powder and 1/2 tsp. salt in a measuring cup. Add regular flour to measure 1 cup.

I used the tip to make my own self-rising flour. It's a lot cheaper than buying a bag of self-rising flour. definitely don't waste your money. In case you're wondering how to cook the sweet potato, you can bake/roast it if you want, but I peeled, cubed, and boiled it like with regular mashed potatoes. I think it worked out really well. It made more than I needed and I froze the leftovers in hopes that it'll thaw ok for another use another time.
Everything blends together very easily. I ended up using 4 Tbsp. of milk and that made a perfect dough.
This was a really nice dough with a really pretty orange color!
I couldn't find my rolling pin easily so I just patted out the dough with my hands and it worked just fine. 
This made 3 more than the 1.5 dozen, so this dough goes a long way!
Here's the finished product, fresh out of the oven.
And the texture of the inside. This had a really great texture.

The flavor is pretty mild, but let's be honest, biscuits are merely vehicles for butter, honey, jam, or gravy, so that's where most of the flavor comes from. This was a good way to get a little more veg into your diet. If you're gonna make biscuits with a bunch of fat in them, you might as well have some veggies in them too, right?!

This would go well at the holiday table. If you're not a fan of sweet potato casserole or pie, give these a try, I think you'll enjoy them!


Sunday, September 24, 2023

Autumn Baking: Week 4-Pumpkin Coconut Soup

I know you're thinking, hey this is a baking project, why is there recipe soup? That's because I made two recipes today, and the pumpkin biscuits, sadly, were a fail. But the pumpkin soup I made was amazing! So, I'll share it here. Since I was unable to find the source of the recipe, I'll write it out, but it's not mine!

Pumpkin Coconut Soup

1 Tbsp. canola oil

1 onion, chopped(1 cup)

2 carrots, chopped(1 cup)

2 cloves garlic, minced

2 (14oz.) cans chicken broth, divided

2(15oz.) cans unsweetened pumpkin

1(140z.) can coconut milk

2 Tbsp. lime juice

1/8 tsp. cayenne pepper

1 Tbsp. sugar

1 1/4 tsp. salt

1.) Heat oil in a large Dutch oven over medium-high heat; add onion and carrot, and cook, stirring frequently, 5 minutes or until vegetables begin to soften. Stir in garlic, and cook 30 seconds. Add 1 can chicken broth; bring to a simmer, and cook 10 minutes or until vegetables are very tender. Remove from heat; cool 10 minutes.

2.) Use a hand-held blender to puree the soup until smooth. Return to the heat and add pumpkin, coconut milk, and remaining can of chicken broth, stirring with a whisk. Bring to a simmer over medium heat; stir in lime juice and next 3 ingredients. 

Note: Can be made 1 day ahead. Reheat when ready to eat.

Makes 8 (1 cup) servings

This recipe is really easy to cut in half, and since I'm only one person, I don't need 8 cups of soup, so I made a half batch.
It doesn't puree as well as it should with the half batch, but I did what I could until the next step.
After mixing this, I used the blender to blend it all again and this worked well to finish pureeing everything. I ended up using one whole small lime, and I did not add any of the sugar. I recommend holding off on the sugar until you taste it to see how it is. The carrots can be very sweet, and so is coconut milk. You may not need it.
Here is the very autumnal-looking finished product! It's really tasty, and I can tell it's gonna be even better tomorrow! I'm not a big fan of squash recipes that lean sweet or use desserty ingredients. If I want to eat pumpkin pie, I'll make one, I don't don't want pumpkin pie soup...But if you want to experiment with herbs and spices, go for it! Curry is a very common addition to soups like this. If you don't want the cayenne, that might be a great addition. 

This is the perfect soup for the start of autumn. It still has a couple hold-outs from summer, but the finished product is all autumn!


Tuesday, September 19, 2023

Autumn Baking-Week 3: Pumpkin Cookies

So, this week I put off doing the baking until after a work day, for some reason, but I had time and energy, and luckily this ended up being a ridiculously easy recipe to make. It was also fun in that I was able to try out my Princess Tiana flour sifter for the first time and it worked really well! She makes everything more delicious. I am also reminded that while I have the big fancy Kitchen-Aid stand mixer, sometimes the cheapo electric hand mixer just makes life so much easier.

This particular recipe is one that I cannot track down the source of, so I will write it out here.

Pumpkin Cookies

1 cup butter or shortening(I used butter)

1 cup sugar

1 cup canned pumpkin

1 egg

1 tsp. vanilla

2 cups sifted flour

1 tsp. double-acting baking powder

1/2 tsp. baking soda

1/2 tsp. salt

1 tsp. cinnamon

1/2 tsp. allspice

1 cup chopped nuts(I used pecans)

1 cup raisins(I used golden raisins)


Preheat oven to 375 degrees.

Cream the butter and sugar together. Add the pumpkin, egg, and vanilla and mix well.

Sift together the flour, baking powder, baking soda, salt, cinnamon, and allspice, and add to the other mixture. Stir in the nuts and raisins.

Drop cookies onto a well-greased cookie sheet and bake about 15 minutes.

Makes about 5 dozen

The creamed butter, sugar, egg, vanilla, and pumpkin don't look very good at the start, and don't worry if some of the liquid starts coming out of it, it'll all mix together again.
So, I made a judgement call on this one. The ingredients say to use sifted flour, and the instructions say to sift the flour with all the dried ingredients. Sometimes they just mean to do it all in a single sift, but I took the instructions literally. I sifted the flour after measuring it, and then sifted it with the other dried ingredients. This made it all very airy and fluffy, I think. It's worth it.
I didn't bother chopping the pecans. They're pretty flimsy, so I just crushed them with my hands. Why waste a knife and cutting board and having to wash them later when you don't have to!
Here is how the batter looks after it's fully mixed. My sister doesn't like raisins, so half the dough remained raisin-free, and the rest got raisins.
Here is the finished raisin-free product. The cookies are small, but this is actually the size cookies are supposed to be. I got 64 out of my batch, if I did the math right. The amount you use per cookie is basically a rounded teaspoon. A literal teaspoon measure, though I just eyeballed it. These were light and fluffy on the inside, but actually a little crispy on the sides. They were amazing!
Here's the interior of the raisin version. These are great too! The smell of these cookies makes the whole place smell like autumn! A great dessert for a chilly, cloudy day today!

I highly recommend these. They are so easy and not time-consuming. Well worth the time and effort! Happy baking!


Monday, September 11, 2023

Autumn Baking-Week2: Pumpkin Muffins

I made pumpkin muffins today because it was too hot to use the oven over the weekend. This recipe was suuuuuuper easy to make. The hardest part was grinding the flax seed, and even that I used an electric coffee grinder to do and it it took a total of about 1.5 minutes! This recipe is also about as healthy as a muffin recipe can be. Thankfully, they turned out really tasty! Since I cannot find the source of this recipe, I'm going to go ahead and write it out, but know that this is not my creation.

Pumpkin Muffins

1 cup whole wheat flour

1 cup flax seed, ground

1 cup canned pumpkin

1/4 cup sugar

1/2 cup brown sugar + extra for topping, if desired*

1/2 cup milk

3 egg whites

1oz. canola oil

1/2 tsp. cinnamon

1/2 tsp. nutmeg

1/2 tsp. allspice

1/4 tsp. salt

2 1/2 tsp. baking powder

Preheat oven to 350 degrees. Put all ingredients in a bowl. Lightly grease a muffin pan, and using an ice cream scoop, put a scoop into each muffin cup. Bake for about 20 minutes. About two minutes in, sprinkle each with a little additional brown sugar, if desired.*

Cool in pan for about 15 minutes over a wire rack, then transfer each muffin to a wire rack. Let cool again until ready to eat.

Makes 14 muffins-157 calories, 6.9g. fat, 3.9g. fiber

*I added the notes about the additional sugar, not 100% verbatim from recipe.

I know the recipe says you can dump everything into one bowl, but I just didn't want to try that. Baking always seems to do better when you mix dry and wet separately and then mix them together.
So, I went with the tried and true method.
And I think it worked great, like always!
The batter is pretty dark, and it might have to do do with the color of the flax seed. Mine was the darker brown kind, but if you used the lighter kind, the batter would probably be lighter too.
This was the first time I got to use my new silicone muffin mold. I read up on it and the consensus was the baked good still tend to stick to the bottom and sides, so I used liners anyway.
Because silicone conducts heat differently than metal, it took about 10 minutes longer for these to bake, so a full half hour.
Here is the finished product. The texture is really nice and chewy.
The flavor grew over time, the spices become pronounced once they're fully cooled. And as always, they're tasty with butter on them!

I'm going to freeze some of these to share with coworkers and my parents later this week. 
So here I am, two for two so far this baking project. I'm hopeful the rest of the recipes will be winners too!


Monday, September 4, 2023

Autumn Baking-Week 1: Pumpkin Bread

 Last year, I felt robbed of our descent into autumn here in Seattle. Summer never ended till the middle of October, and we even had a 90 degree day that month! When autumn finally arrived, the leaves changed pretty much overnight and we went right into the less fun part of autumn, when the leaves fall off the trees. This year, it's more normal. The leaves are slowly changing, the weather is slowly cooling down. I can finally use the oven again!

Since I have to start my 12 Weeks of Christmas in October, this gives me a short window of time to truly enjoy autumn baking and all that it entails. This year I am focusing on pumpkin-based baked goods. Today's was this recipe for pumpkin bread. I thought it would be a good, easy way to get this started. It's a very basic recipe and I had all the ingredients except the pumpkin, which I got at the store this weekend.

Here is the visual breakdown of how it went.

The wet and dry ingredients in their separate bowls. This is a very basic recipe, but there's a lot of spices in it, so it doesn't taste plain at all.
Blended ingredients, but not mixed together yet.
And post blending of the wet and dry ingredients. It almost has the consistency of pumpkin pie filling.
My sister hates raisins, but I love them, so instead of one large loaf, I used smaller loaf pans and did half with raisins and half without. All of it had walnuts, though.
Here we have them out of the oven. When you use smaller pans like this, it only takes about 40 minutes to bake, instead of over an hour, so that's nice to use less time and energy this way.
Buttering the inside of each pan makes so easy to take them out, but keep the pans because once they're cooled off, you can put them back in to keep them from drying out as much.
The texture is really soft, and the flavors are strong. I really liked this with some butter on it. I am going to go out on a limb and assume that if properly packaged, these could be frozen and thawed at a later time if you can't eat all of this by yourself at one time.

Well, there you have it, a really easy and delicious way to get back into the swing of things for baking in the autumn. Buy a can of pumpkin the next time you go to the store and try this one out. You won't regret it!


Tuesday, July 4, 2023

S'mores Bars-4th of July Dessert

 S'mores Bars

So, I wanted to try this out for a while, and 4th of July seemed like an ideal time for it. It's super easy, and I'm not even going to bother writing out the recipe. Basically, make the traditional recipe for rice krispie treats, the marshmallow kind. Instead of using 6 cups of the cereal, use one regular-size box of graham crackers that you crush up gently. You aren't going for powder, but you want the pieces to be smaller than bite size. They crush really easily in your hand and I measured, one box makes exactly the 6 cups you need. When the butter and marshmallows are melted, fold them in like normal. You'll need a strong spoon or spatula because they are more solid than the cereal and need a bit more strength to mix properly.

After putting them in the 9x13 pan, melt regular Hershey's milk chocolate bars, the kind that usually go in a S'more, then pour it all over the top and spread out evenly. That's it, that's all you do! I had to put them in the fridge for a while to get the chocolate to harden cuz it was too hot out, but definitely take them back out again when you're ready to cut and let it come to room temp. The crackers get hard in the fridge and are hard to cut and eat. 

These are super easy and super delish. Highly recommend them!

Happy eating!