The Holiday: El Dia de los Muertos (Mexico)
Dia de los Muertos, or Day of the Dead, in English, is the time of year that Mexicans celebrate the dead, and as with Halloween in Europe, is thought to be the one time of the year where the dead can return to this realm to visit the living. It is a pre-Columbian holiday that has changed and expanded over the years, particularly after the Spanish invasion and the mixing of Catholicism with the original holiday. As with Halloween in Ireland(see last week's post), the Catholic church kept the main rituals of the original holiday, but changed some of the meanings to make it fit in better with their belief system. Now, Dia de los Muertos, is a two day celebration beginning on November 1st and ending on November 2nd. Each day has a different focus. November 1st focuses on children who died young, stillborn children, and miscarriages. This is a day to honor these children. November 1st also coincides with All Saints Day in Catholicism. November 2nd coincides with All Souls Day in Catholicism, and this is the day for adults who have died. Families will go to cemeteries and clean off graves and bring food to share with one another. The mood is festive and joyful, and the idea is to invite your deceased loved ones to spend the day with you.
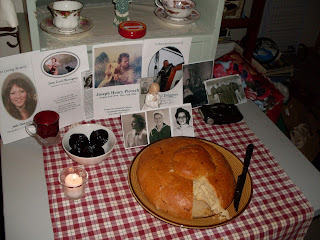
Dia de los Muertos is something I've known about for a long time, since my Spanish class days in middle and high school, but I never celebrated it until a few years ago. My family and extended families have been steeped in untimely deaths over the last few years, and I wanted a way to honor them, particularly my cousin, for whom Mexico was his favorite place on Earth. The holiday landed about a month before the first anniversary of his passing, and it seemed like the perfect way to help deal with my grief. I researched the holiday and set up an ofrenda (altar) with some of the traditional items, including an apple and pan de muerto (bread of the dead) that I made myself. It was lovely. So lovely that I did it the next year too, and had a larger ofrenda, with items to honor and entice even more of my loved ones.
My first ofrenda devoted to my cousin
Last year's ofrenda, includes pan de muerto and black licorice wheels as well as objects and photos associated with all of my loved ones.
Unfortunately, this year, Dia de los Muertos lands on a weekday, which makes it really difficult to make fresh bread, so I will not be doing an ofrenda this year. But, I made pan dulce (sweet bread) today to celebrate.
Dia de los Muertos involves other things as well, like sugar skulls (calaveras) and skull make up (like the picture at the top of this post). Some people wear costumes too. With the concerns about cultural appropriation, this is the line I have drawn for myself, personally. I partake in the food element of the holiday, and the remembrance of my loved ones, but I don't dress up or put on make up. To me that feels like taking something that isn't mine.
This is fast becoming one of my favorite adopted holidays. There is a lot of information about it on the internet, and if you want a visual to go with your research I would recommend the movie The Book of Life, as well as the Dia de los Muertos episode of Elena of Avalor. Both handle the subject with care and respect and will help you learn a lot about the holiday and the true meanings behind it. The biggest thing to do, when partaking in a holiday that isn't one of yours originally, is to be respectful of it. And to actually bother researching it. Dia de los Muertos isn't "Mexican Halloween" or an extension of Halloween, it is it's own holiday, rich with meaning. It has managed not only to maintain its original meaning, but to adapt to the new rituals that have come out of it over the years as well.
The Food: Conchas
I have made pan de muerto for the last couple years now, and the point of my blog projects are to try new things, so I didn't want to make it again. I wanted something different, and I had just found this recipe(I can't remember the source, unfortunately) recently and was really excited to get to try it out.
I have always been interested in this item. I have seen them in pictures and on TV before, and in panaderias(Mexican bakeries) but didn't actually know what they were. They were bread of some sort, but the topping is what intrigued me the most. It's like a brightly colored topping with lines all through them and I had no idea what it was made of, what it tasted like, or how you made them. They were a complete mystery to me. Conchas, are rolls made to look like seashells which is why they have
those wavy designs on top, to make it look like a seashell. This recipe takes all the mystery out of it and it turns out, they aren't that complicated to make. They are a lot of fun to make, actually! Here's the recipe:
Buns:
3 tsp. active dry yeast (this is about 1.5 of the yeast packets)
1/2 cup warm water
1/3 cup lukewarm milk
1/3 cup sugar
1/3 cup butter, room temp.
1 tsp. salt
1 egg
3 1/2 cups flour, plus extra for dusting
Sugar Paste Topping:
1/3 cup sugar
1/4 cup margarine (I actually used margarine for this. Since butter is used in the bread, I figured there was a reason for using margarine here, and it wasn't my place to second guess.)
1/2 cup flour, plus more for dusting
1/2 tsp. vanilla
Assorted gel food colorings (I used the liquid kind, not the gel kind, and it worked just fine. Just use whatever you have on hand.)
Dissolve the yeast in warm water in the bowl of a standing mixer fixed with a paddle attachment. Add the milk, sugar, butter, salt, egg, and 2 cups flour. Stir together until just combined. Switch to the dough hook attachment. (I used the dough hook attachment the whole time and it worked just fine. Don't bother getting another item dirty that you'll have to wash later on when you don't really need to.) Add an additional cup of flour on medium-low speed. When the flour is incorporated, knead at medium speed for 5 minutes. The dough should be elastic and slightly sticky, but easy to handle. If the dough is very sticky, knead in additional flour. (I did this step by hand. I took the dough out of the bowl and kneaded it by hand. I enjoy kneading by hand and seeing what the dough feels like. But, do what you like most!) Place the dough in a large greased bowl and turn the dough over to coat. Cover with plastic wrap and allow to rise in a warm place until doubled, about 1 1/2 hours.
Meanwhile, make the sugar paste topping: Beat the sugar and margarine together until light and fluffy.
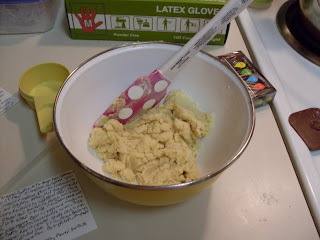
Stir in flour and mix until a thick dough forms. Add additional flour, if needed. Divide dough into 3 or 4 pieces and tint with food color. If the dough becomes sticky from the food color, add more flour. Cover pieces with plastic wrap until ready to use.
When dough is ready, turn it out onto a slightly floured surface.
Divide the dough into 16 equal pieces. Shape each dough piece into a ball by tucking the corners over. (Don't roll between your palms, as this will cause the dough to deflate and become tough.) Place the dough balls on a parchment-lined baking sheet.
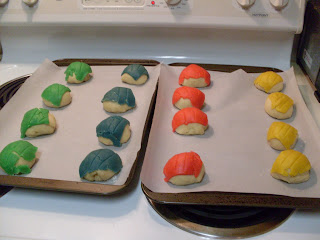
Roll out the sugar paste pieces on a lightly floured surface. Cut into 2 1/2" rounds with a cookie cutter. Use the cutter to score lines in paste to resemble ridges on a seashell. Transfer to scored sugar paste rounds to the bun, using an offset spatula.
(Here is what I did with the paste, as opposed to the instructions: I rolled each color out and cut it into quarters. From there, I used the offset spatula to pick up each piece and put it onto the bun but didn't attempt to make it into a shape. This was really hard dough to work with. I then used the back of a knife to draw the lines on each piece. Just score, you don't need to cut all the way through. This seemed to work pretty well.)
If the paste won't adhere naturally, use a pastry brush to apply dots of water on the underside before applying to the buns. Allow the buns to rise on the baking sheet for 40 minutes.
Preheat oven to 375 degrees. Bake buns for 18-20 minutes (I did mine for 18 and it was perfect), or until they are fragrant and lightly brown on the bottoms. Store the leftovers in an airtight container.
Makes 16 buns
These look just like the ones I have seen in the store and online! I was really excited to see them. I was even more excited to taste them. The topping is crunchy and adds a great texture to the bread. It's not overly sweet. The bread is really soft and I could have probably eaten 5 or 6 if I had wanted to, which I sort of did, but I made myself use restraint.
I can't wait to take these to work tomorrow to share with my coworkers. One of my coworkers is from Mexico and was excited when I told her about making these over the weekend. Hopefully they will taste like she remembers!
Well, if this is the first you are ever hearing about this holiday, take some time to research it. You might just find that you want to try it out yourself next year!
Sunday, October 30, 2016
Subscribe to:
Post Comments (Atom)


No comments:
Post a Comment